Sharjah Light Festival: This is an annual event that changes some of the beautiful architectural structures of the Emirate into sights of marvel and spell binding visual treat.
Captured here are some of images of the Al Noor Mosque as it gets transformed by the light effects and brings forth some magnificent images right in front of you that leaves you enthralled. Enjoy.
A simple homemade lunch that has Bajra Bhakri with ghee, Dill and black chana sabji, Kadhi, Roasted peanut chutney, Gur with ghee, tilgul laddu( store bought), and onion.
Wishing you all Happy Sankrant. As said in marathi-Til gul ghya goad goad bola.
Sharing some of the pictures of the food that I cooked in my Kitchen in the recent past. It was a great time creating this art on my food and thought to go ahead and share it today and not wait for the recipe post to be written. It will follow eventually but until then do enjoy these pics.
Ashus Focaccia Garden (before baking)Ashus Focaccia Garden (after baking)Ashus Spinach & Cheese Tumbler BreadAshus Focaccia Bread. (Smile, these days too shall pass.)Ashus Laddi Pav/ Soft Bread Rolls Ashus Fruit art -Fruits on my plate
It has been so much fun to create these recipes and each of these food moments was memorable. Trust you all too enjoyed these images as much as I loved creating them.
Hope all are keeping safe and enjoying healthy eating.
Every year we celebrate Ganpati festival for five days with lot of enthusiasm and excitement, Puja invites and festivities and Prasads and not to forget all the decking up in the traditional attire. However, this year it was a bit different. This year my Bappa was travelling with me to a very beautiful place in India.
The runner me had first heard of the Ladakh marathon in September 2018 when my running friends posted their race pictures. I was still recovering from a running injury and had been on a break from running for almost six months. To motivate myself to return to running and feel confident about it, I set my mind on doing the 2019 Ladakh Half Marathon race. So I registered for this race event as soon as the registration opened in March 2019, the race was in September. As Leh is at a higher altitude 3500+ meters and with low oxygen levels, we are required to reach there a week to 10 days in advance to acclimatize ourselves before the run. This was my reason to travel to Ladakh a week before my run and this is how my Bappa ended up traveling with me to Ladakh.
This in how I celebrated my Ganpati festival 2019 in Leh, Ladakh, a bit of a small scale festivity than every year. The Modaks and other Prasad as offerings to the Bappa are all homemade and were carried by me on the trip. I did get to see very big Ganpati Murtis and visit temples in other cities that I visited after my marathon event was over. It was a great time spent roaming around Ladakh, Bappa celebrations, and then more traveling to meet elders of the family. More about the Ladakh travels and picture sharing in the next blogs to follow.
Wishing you all a great day ahead, and thank you for stopping by.
Hello and regards to all my blogger friends and readers. After a long absence, it is finally time to return to blogging once more 😊. Before starting anything new I always seek the blessings of Bappa morya, hence this post starts with sharing some pics of the Ganpati Celebrations 2018 at my place.
Bappa Morya 2018Ganpati Bappa MoryaMy Bappa collectionGanpati Bappa Moryaashuskitchen Modak ashuskitchen prasad on the first day of the five day Ganpati festival
Will be back with more posts, pictures, and my stories.
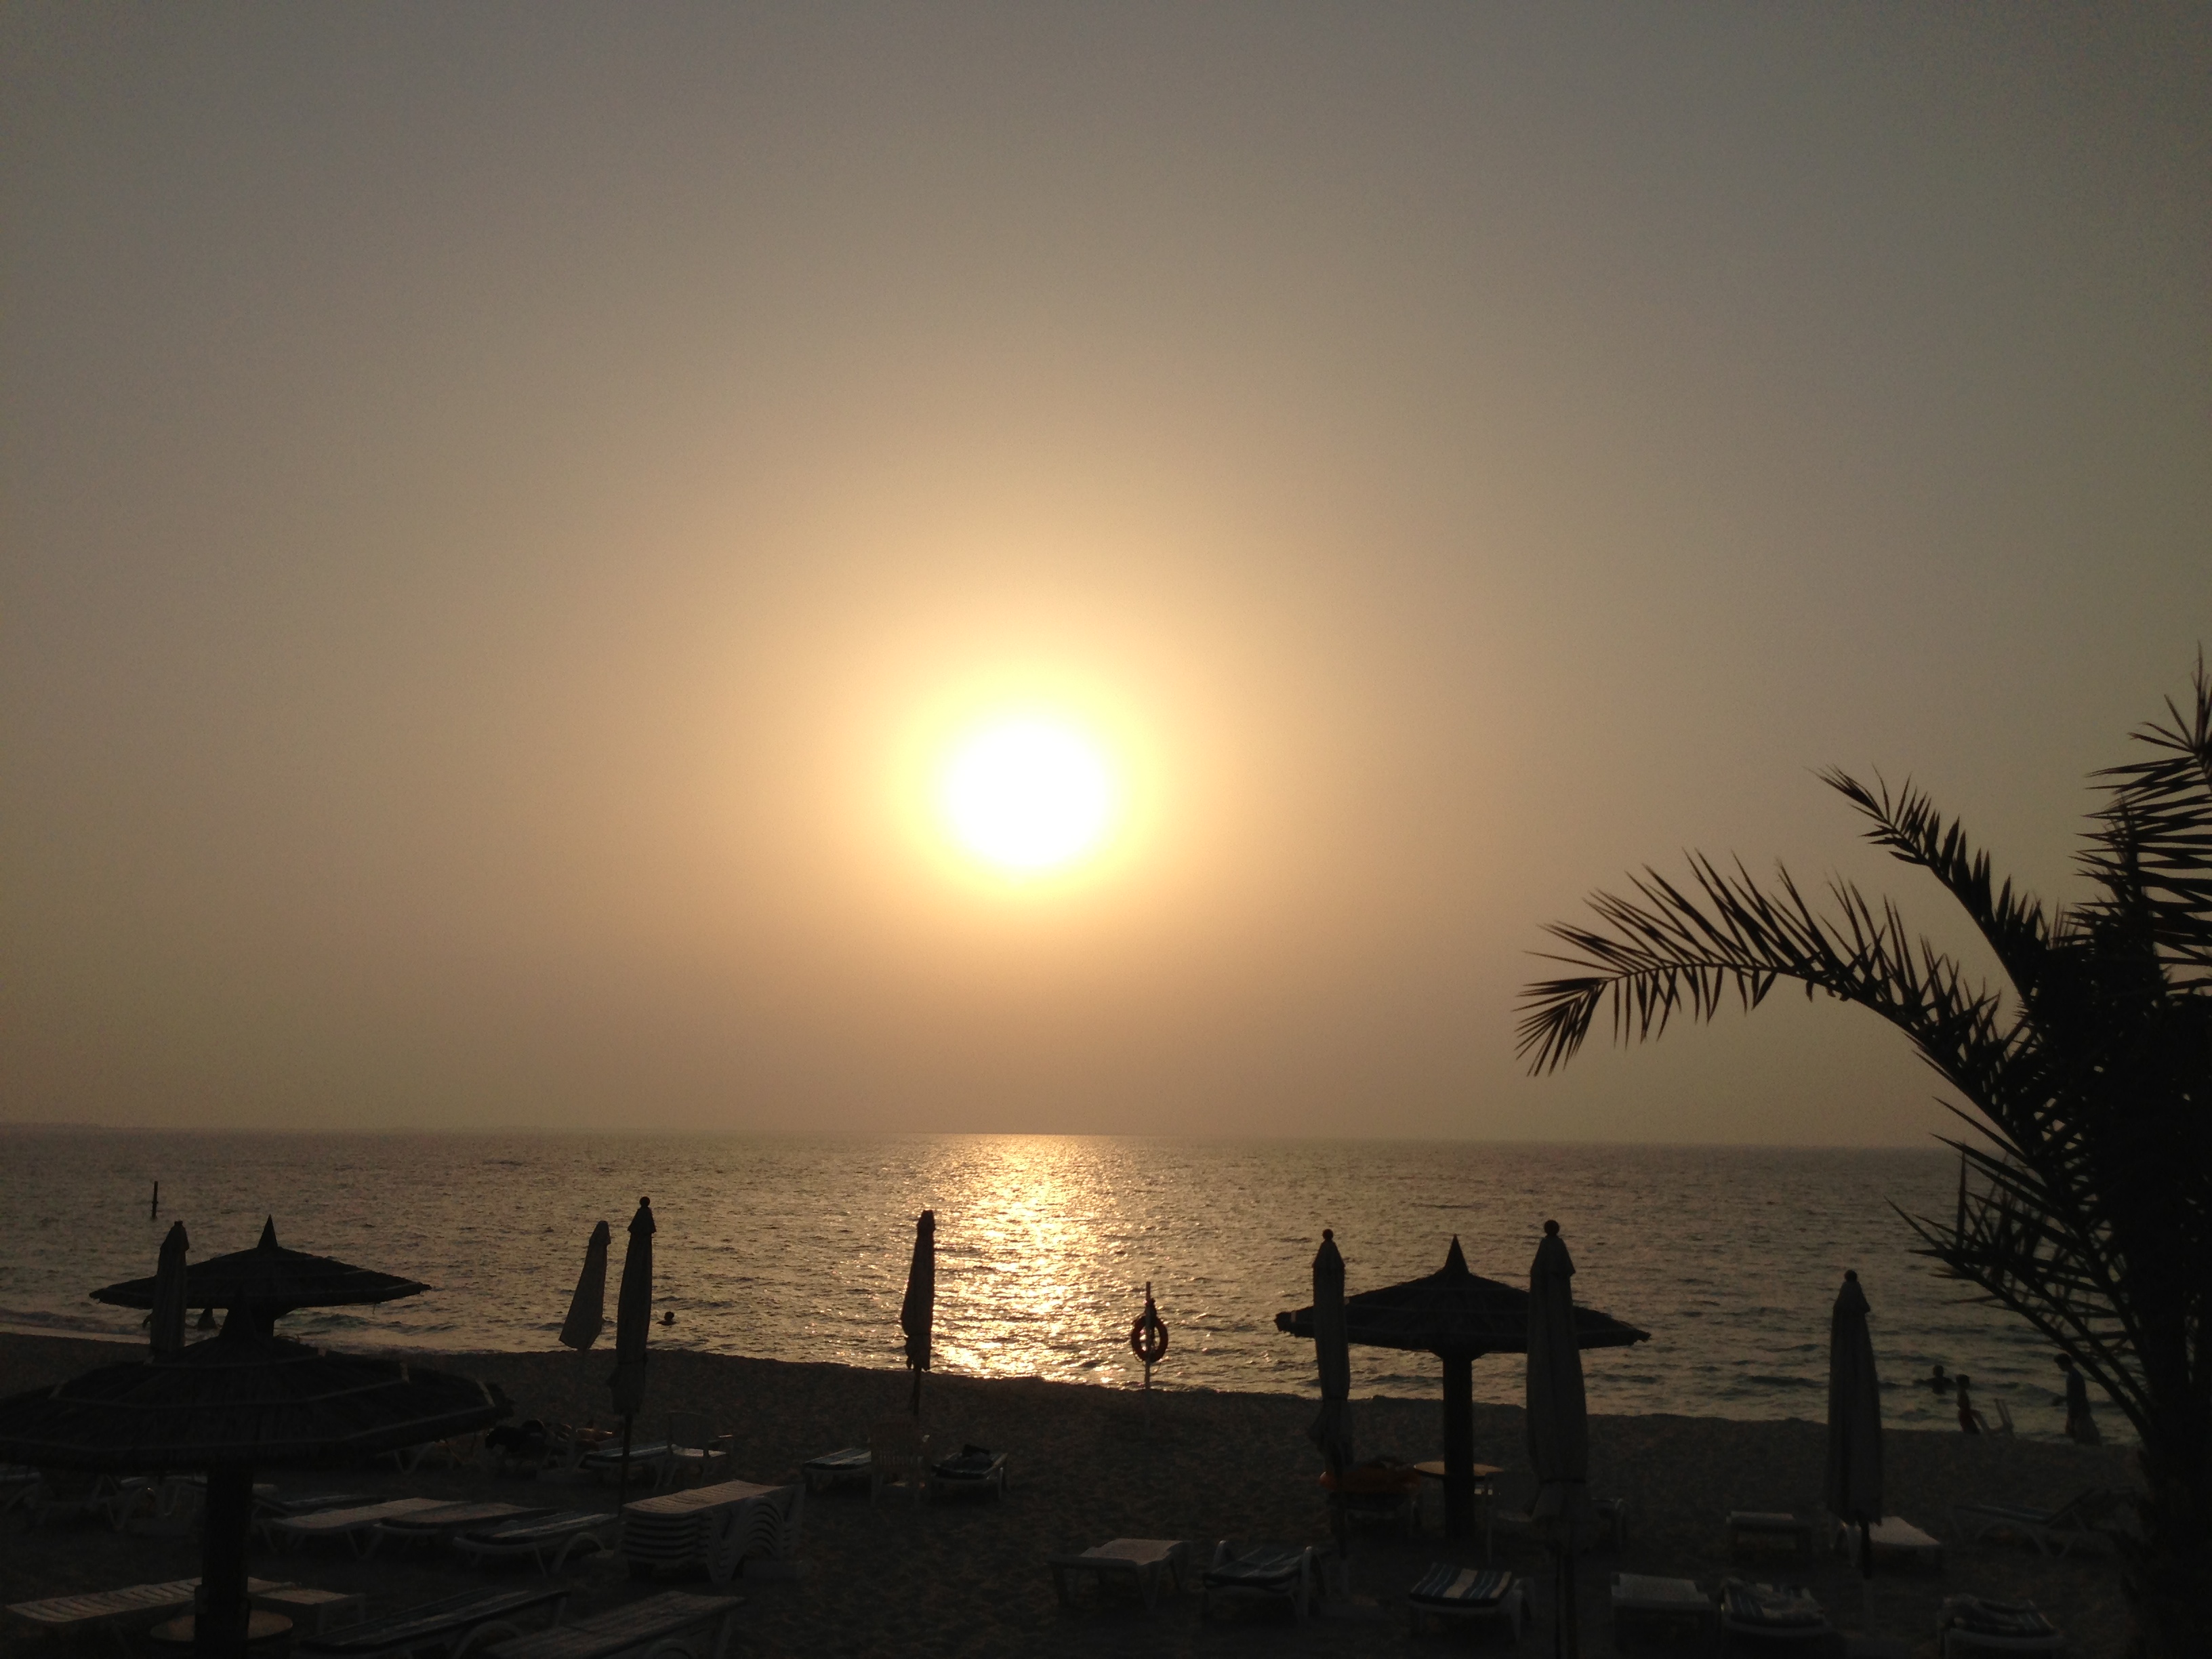
For this week’s photo challenge I have selected pictures of the setting sun that I had captured from the beach of a hotel where my Jr. used to attend swimming coaching. As he attended his professional swimming coaching at this location and I waited for his coaching to get over, I have been privileged to enjoy many evening walks by the beach and see the most beautiful sunsets.
The view of the vast horizon and the setting sun with layers of varied colors, the gleam reflected on the sea water was breathtaking, and I had to freeze the moment in this image captured on my iPhone camera and posted here as my entry for this challenge.
ashus Photography-Sunset
ashus Photography-Sunset
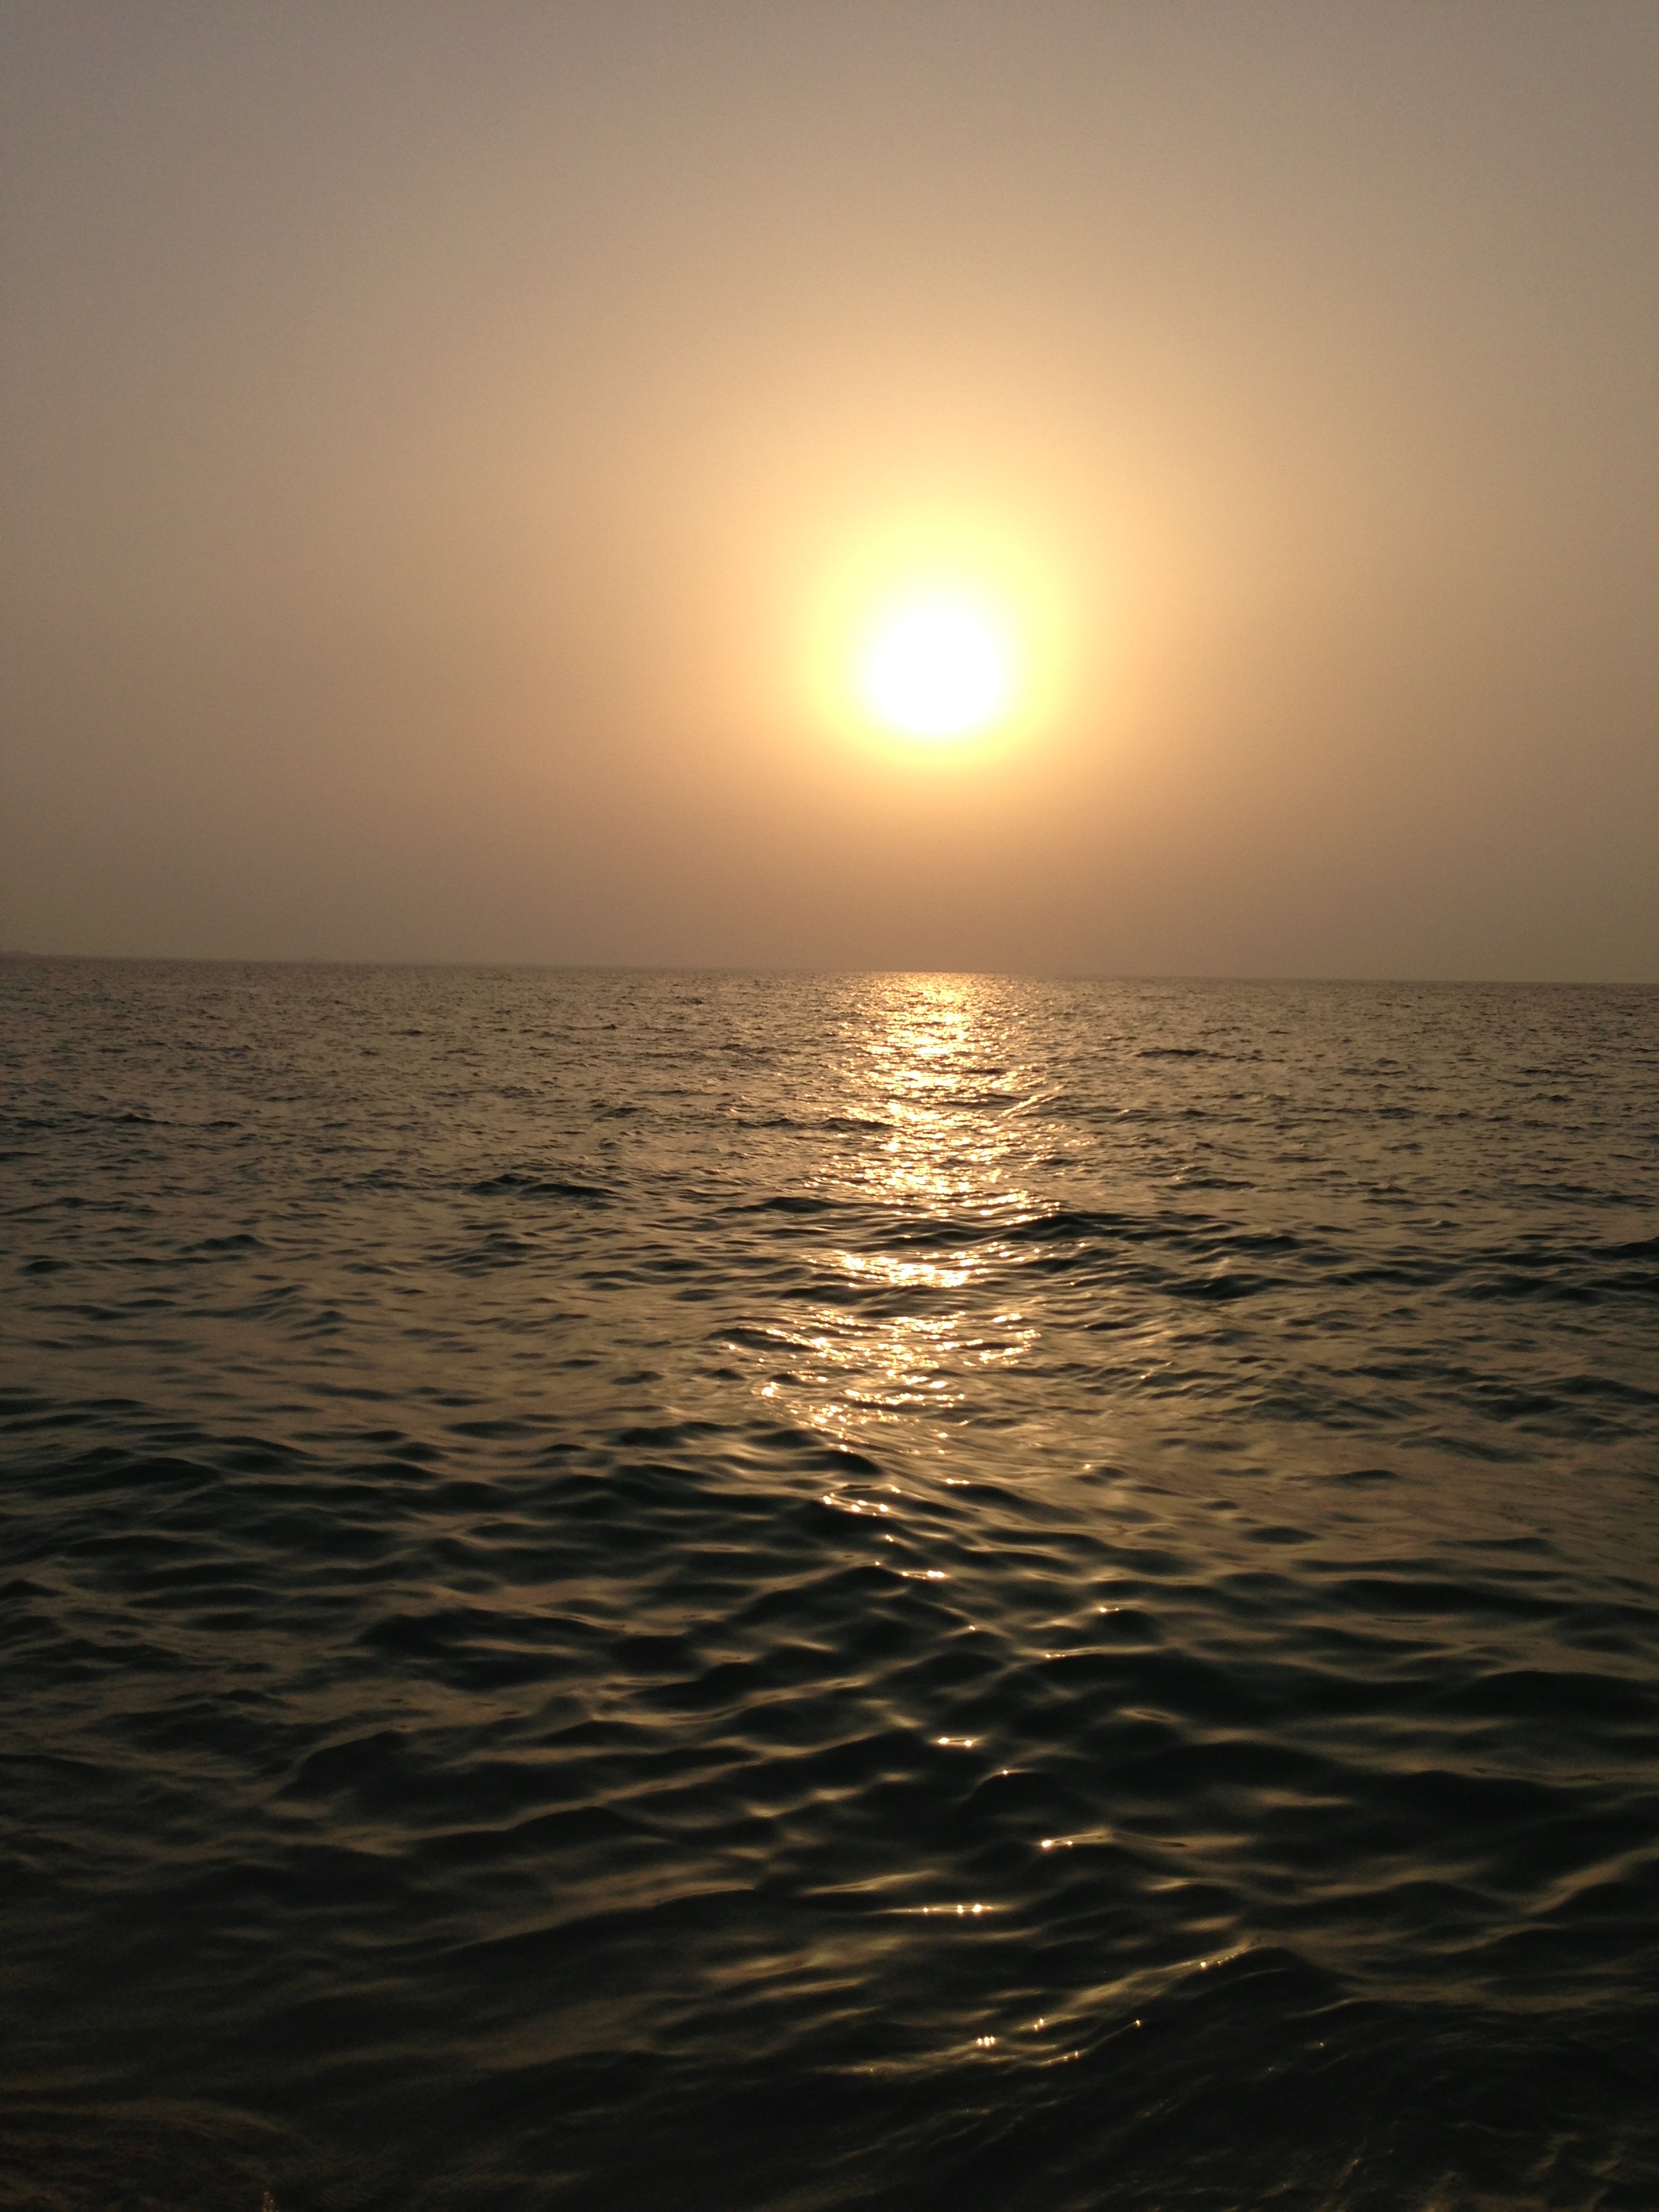
This below picture is also from the same beach but clicked on a different day at different time.
ashus Photography-Sunset
Do share your thoughts about the pictures, looking forward to read them. Thanks.
Finally, after a very long Summer break, the schools here have reopened on the 10th of September. This reminded me to make this post of my regularly cooked recipe, the most preferred school lunch snacks/meals, read it as food that is readily welcomed by my fussy eater. To keep lunch box as healthy, nutritious and as well as filling, I always have preferred to pack different types of parathas or wraps or rolls as part of the afternoon meal, using the ingredient list that my kids like. Sharing today my Paneer Paratha recipe, one of the favorite food of my kids.
I use the fresh paneer for making the filling and the wholewheat flour dough for making the outer paratha coat. The parathas are made thin and medium-sized and ghee roasted to make them crisper. I don’t like very big and thicker parathas, keeping them medium and thin helps to control the portion size and one avoids eating in excess. One should use these simple and useful tips and watch the quantity intake of the food they eat at any given meal. It is a general tendency with all of us to eat in excess when one likes something or is eating a favorite food.
ashu’s Paneer Paratha
PANEER PARATHAS
INGREDIENTS: For Paneer Filling:
ashus recipe-Paneer paratha
Fresh Paneer (cottage cheese) : 300 gm
Onion: 1 Medium
Green chilies: 2-3 nos
Green Coriander: few leaves
Cumin : 1 Tsp
Salt & Pepper : To taste
Ghee/Cooking oil: As per taste preference
Dough: (Click the link for fulka to make the dough)
Wholewheat flour: 200 gm
Water: 100 ml (or as needed)
Note: Follow the above given recipe link to make the paratha dough.
ashus recipe: Wholewheat flour dough
METHOD:
Filling: Grate the paneer and keep in bowl. Finely chop the onion, green chilies and the coriander, and mix with paneer. Add the cumin as it is or use a coarsely, roasted powder. To make the cumin powder, dry roast the cumin and coarsely crush it using mortar and pestle or simply ground it using the rolling pin. Season the paneer with salt and pepper as per taste. One can also add chat masala powder if preferred.
ashus recipe-Paneer paratha
Make the medium soft dough of the wheat flour, and use lemon-sized dough balls for making the parathas.
ashus recipe-Paneer paratha
Roll the ball to make a small puri and fill 3 tbsp filling into this.
ashus recipe-Paneer paratha
Hold the ends of the puri and giving a circular twist close it tightly and cut away the excess dough from top.
ashus recipe-Paneer paratha
Dust this paneer-filled dough ball lightly in flour and then using a rolling pin roll it into a medium-to-thin paratha.
ashus recipe-Paneer paratha
Heat a Tava or fry pan on the gas burner, put the paratha on the tava and cook on both sides.
ashus recipe-Paneer paratha
Then using a tsp of ghee on both sides, roast it to make it crisp and golden. One can also use any cooking oil for roasting the parathas.
ashus recipe-Paneer paratha
Serve the parathas as is or cut it into triangles using a pizza cutter and arrange on a plate as shown. Serve with any chutney or tomato ketchup as per preference.
ashus recipe-Paneer paratha
ashus recipe-Paneer paratha
Give this paratha a try in your kitchen to find out if you all like the taste. Happy cooking and eating homemade food.
ashu’s new recipe– PRAWNS POTLI- my tribute for my elder brother.
The flow of life is ever changing, making us drift along with it, sweeping us through its different waves and giving us the moments, emotions, and experiences that one may not always be ready to accept or deal with. But one does learn to sail through if we allow ourselves to accept and adapt. It is in our hands how we handle each and every moment that we have to face on a day-to-day basis.
This post is made in memory of and as my fond remembrance of my eldest sibling whom we lost this month. The loss of our loved ones leaves a huge vacuum and fills us with grief, I have been dealing with my share of this emotion. But it would be wrong to let grief overtake the memories and good times that were shared, one should be celebrating the sibling bond and the strength it imparts. As I look back and lovingly cherish the journey I shared as his younger sibling, remembering all the positives that I got to learn from him, I decided to cook a new recipe in his honor as my tribute and respect towards him.
He was a big time foodie, and as I reflect back to my childhood days, he was the influence I think that might have pushed me to this hobby of cooking and learning new recipes. He was the connoisseur of food of our family, loved different cuisines, and introduced us siblings to restaurant foods and knew the best food joints/places in the home town while we were growing up and later too, and also at the same time was the most dreaded critic of our cooking, the cooks of the house, even until the recent days. He was a perfect event manager, menu planner for any functions or marriages that happened in the household.
It is this foodie nature of his that I want to cherish forever and sharing a part of him with you all by the above writing about him. As he loved non-vegetarian food, hence I decided to try something new using Prawns.
PRAWNS POTLI
ashu’s -Prawns Potli
INGREDIENTS:
For The Dough:
Refined Flour: 200 gm
Fine Semolina: 100 gm
Salt: 1 pinch
Water: 100 ml ( or as much-needed to make soft dough)
For The Filling/Stuffing:
Prawns: 500 gm
Onion: 1 Medium-to-small
Green Chilies: 2 (or add as per personal taste)
Green Coriander: 2 Tbsp (few sprigs)
Cumin: 1 Tsp
Salt & Pepper: as per taste for seasoning.
Cooking Oil- As required for Frying
ashu’s recipe-Prawns Potli
METHOD:
Put the refined flour, semolina and a pinch of salt in a glass bowl or any bowl and mix together. Adding water to this mix make a soft dough and keep it covered until we prepare the prawns filling. Before using the dough we should knead it well.
Clean and devein the prawns, wash and pat them completely dry with a napkin or kitchen tissue roll.
Coarsely grind the onion, green chili, coriander, cumin, and the Prawns in a mixer pot or food processor pot. Add the salt and crushed peppercorns. We do not want the prawn flesh to become gooey, but remain smaller chunks. (For the initial Potli’s I had used this uncooked raw filling, but the wet content leaked and oil spluttered. )
ashu’s recipe-Prawns Potli
Heat a fry pan/Kadai and add 1 tsp oil (just to avoid food sticking) and then add this ground mix and saute so that the prawns get slightly cooked and all extra liquid if any gets completely dried away. This will be our filling for the Potli.
ashu’s recipe-Prawns Potli
Knead the flour dough well to get a softer dough. We can use a drop or two of oil to avoid the dough from sticking to our palm.
Make small round balls of the dough and roll out thin circular discs as seen in the picture below. Place little amount of filling and bring the ends closer, twisting and tightening together towards the center. Make sure to seal it in center and leave the ends free so that it resembles a Potli.
ashu’s recipe-Prawns Potli
ashu’s recipe-Prawns Potli
Once the Potli’s are ready, heat a thick bottomed pan or Kadai and pour oil in it for frying. As the oil heats, slowly we slide the Potli’s into the hot oil and deep fry first keeping the flame of the stove on high and later making it to medium heat. The Potli’s should be fried to golden brown, reducing the heat ensures the ends become crispy .
The frying part needs our attention and demands more patience from us. If any water from the prawns makes the filling wet, and if the ends are not properly sealed then the liquid oozes out into the hot oil, making it splutter and also burns the oil. Hence try to avoid any water/liquid in the filling. Initially I had not used cooked filling, but the raw coarsely ground prawns and the water from the onion and prawns made the oil splutter and hence I pan dried the water. Avoid cooking the filling for long, Prawn flesh is delicate and we do not want to make it rubber textured.
ashu’s recipe-Prawns Potli
As you can see my potli’s are of different shapes and sizes, more patience required in future I guess 🙂 .
We can make all the round discs first, later fill the filling and seal the ends, and thus make and keep the potlis to fry together. Or one could make it in batches of 3-4 and simultaneously fry while making. Do as per your convenience 🙂 .
ashu’s recipe-Prawns Potli
I preferred to keep the prawn filling simple. The sweetness of the prawns, the heat from the green chili, the fresh herb taste and dash of the cumin and freshly ground peppercorns, perfect taste with each bite of the potli. Also note, it is better we make the potli’s smaller in size, they puff up a bit while frying and we can get perfectly sized ones to hold and which can be finished up in a bite or two. We need to fry them to perfection so that the outer ends are crispy and the bottom part is medium soft to bite into.
Serving Options: I used store-bought Tomato and Chili sauces as dips to serve with the Prawns Potli. We could also serve it with a hot and tangy green chutney.
ashu’s recipe-Prawns Potli
I am feeling happy as I share this recipe that I made with love and affection for my brother, in his memory and in the process doing my bit to carry on the legacy of introducing new foods and recipes with the folks who are part of my life and also with those who cross my path.
Enjoy and stay content doing whatever that makes you happy 🙂 .
Ashu wishes you all a very Happy Gudi Padwa / Ugadi. A happy Chaitra Navratri too.
Gudi Padwa is a festival celebrated in Maharashtra on the first day of the Chaitra month, it marks the beginning of the new year of the Hindu calender. It is the time to welcome the mango season 🙂 . Ugadi is celebrated in Andhra as the first day of the new year.
The rituals followed for this auspicious day are making colourful rangolis on the front entrance of the house, tying a marigold flowers and mango leaves toran at the entrance door. A gudi is setup and worshipped and an elaborate vegetarian meal is cooked and offered as Naivedyam. A Shrikhand Puri, or Amrakhand or Puran Poli sweet is made. Pachadi too is made in some houses, it is a neem leaves, tamarind and jaggery mixed liquidy dish. I do not make this, never learnt it, though my mother used to make it. Raw mango dishes too are made.
Sharing couple pictures from today. I have not made many a dishes like the masale bhath and raw mango daal etc, made puran poli for sweet though I got Alpohsnso mangoes for the Amrakhand that I did not make 🙂 , will make it for the weekend menu! I made Bharli Vangi, mixed daal vadas/pakode, alu vadis, varan baath and mattha and fulkas. Even though I skipped some dishes but this itself was a heavy lunch, couldn’t stop with only one puran poli😀.
Chicken Momo is a dumpling which is one of my favorite and hence a frequently made food in my kitchen. I make it using refined flour and boiled chicken that is seasoned with simple seasonings. I have already shared a couple other recipes of momos, but the chicken momos was not yet posted.
CHICKEN MOMOS
INGREDIENTS:
Refined Flour: 250 gm
Boiled Chicken: 250 gm
Green Coriander: 2 Tbsp
Salt: To taste
Pepper: For Seasoning as per taste
Water: 1 glass (as needed)
METHOD:
Boil/Steam the chicken (I used 1 chicken breast) in a pressure cooker or rice cooker for a single vessel or 15 min.
Take a bowl and make a medium soft dough of the refined flour to which a pinch of salt is added, and keep the bowl covered.
Shred the boiled chicken, add salt and pepper as per taste and the chopped green coriander. This will be our Momos filling.
ashuskitchen -Chicken filling for the Chicken Momos
Divide the dough into small balls and roll out thin circular puris. Spoon the chicken filling on the puri, and then bring together and close all the ends giving a twist before sealing at the top. I prefer to remove the excess dough at the top end.
We can give any shape to the dumplings, but I prefer the one seen in the pictures. The more one practices shaping and making the momos, the better the shape 🙂 . I like to make smaller shaped momos, easier to eat in a single or two bites. Also note, the thinner the outer coat, it tastes better, my personal preference here.
ashuskitchen-Chicken Momos
ashuskitchen-Chicken Momos kept ready for steaming
Brush the steamer basket with oil before putting the momos for steaming, this prevents them from sticking to one another or to the basket, and we can easily remove them without the filling falling over from torn momos.
Steam the momos for 10 minutes, until the flour cover becomes shiny.
ashu’s-Steamed Chicken Momos
Serve them hot with a dip of choice, I have served with the parsley pesto that was handy in my fridge. Click for the Parsley Pesto recipe here. It tastes best with the spicy red chutney made of tomato and ginger. You can click here for this recipe.
ashu’s- Chicken Momos
As always I am happy to share with you all another of my favorite and nutritious recipe. Hope you would like to give it a try in your kitchen too. Do click the links below for my other momos recipes:
The visit to Georgia in July 2016 introduced me to this dish- Khinkhali, a dish that I find to be a similar version of Momos that I am so very fond of eating and making in my kitchen.
The first lunch after landing in Tbilisi, Georgia in a restaurant in the busy Tbilisi Center, the menu card displayed this bigger version of dumplings that looked similar to momos. The guide told us it is called Khinkali and also informed us the way how we were supposed to eat it. It is a boiled dumpling with filling inside, a fried version could also be seen in the menu card. The inside filling could be of either Beef, lamb, chicken, potatoes or cheese etc. The menu card in the restaurant displayed the various Khinkali that were sold.
ashusphotography-Georgia travel
While visiting the Svetitskhoveli Cathedral, a UNESCO World Heritage Site in Mtskheta, we stopped for lunch in the neighboring restaurant and I was able to see and click these amazing pictures of the Khinkali in making.
The Khinkali are shaped and kept on a board and are ready to be put into boiling water.
ashusphotograpy-Khinkali
ashusphotography-Khinkali
ashusphotography-Khinkali added to the boiling water for cooking.
ashusphotography-Khinkali getting cooked
ashusphotography-Georgia travel
ashusphotography-Khinkali
The hot Khinkali is then served to us and we hold at the folded top part and eat the rest of the khinkali and leave behind the top thick part on the plate. The filling is as per our choice and order.
I find it interesting to note that the mountainous regions are colder and one needs food that is easy to make, simple, and hot. The Nepal travel saw steaming hot momos being listed on the menu cards, the Georgian travel to the Mtshekta region saw the Khinkali in the process of making. This Georgian dish is famous throughout the country, and I would like to add here that it is similar to the steamed Momos, only the size is bigger and also the coating seems to be thicker. The potato and cheese filled Khinkali was too bland for my taste with only salt added , hence I could not relish them both.
Travelling to places makes us aware of not only the region, landscape and people but also the food habits and one finds a lot of similarities in food across far-flung regions with similar dishes but having the regional names. I find similarity of the Khinkali to the dumplings that one gets to see in a Chinese, or Tibetan or a Nepal menu. Do take every opportunity to travel, so that the foodies like me get to learn new recipes after each tour 🙂
I have tried making my version of the Khinkali yesterday and that will be my next post, so do return to check that out too 🙂 .
My entry for this Week’s Photo Challenge: The Road Taken
I have always been fascinated to click pictures of the road that lays ahead or passed by while I am sitting in the passenger seat of the moving vehicle. These pictures are from our Barbecue picnic outing with friends in the month of January 2017 to the Jabal Al Jais mountains in the Emirate of Ras Al Khaimah, UAE. We have to crisscross through the mountains to reach to the point at the top until where the road is open for public use, construction is still seen in progress further up this point.
The Jais mountain is part of the Hajar mountain range bordering Oman. The tallest part of the Hajar mountain range lies in the neighboring Oman and the Jais mountain is the second largest of it that lies in the UAE.
WPC: The Road Taken to Jabal Al Jais
WPC: The Road Taken to top of the Jabal Jais Mountain
WPC: The Road Taken
This is the view from one of the mountain top that we had hiked to after parking the car at the end of the motor-able road that is open to public. The view is breathtakingly beautiful to see from here; the cotton candy clouds, the sun rays giving a golden glow, the blue clear skies and the chilling winter air that sends a shiver through us, it indeed was a beautiful long drive that is worth driving on.
You can check out my post on the Jabal Al Jais mountain here.
The food packed for the school lunchbox should be nutritious, healthy, balanced and most importantly appealing to the kids. It is always challenging to manage to pack food keeping all these factors in mind, especially if the kids are foodies and very picky in taste. My kids, like most kids love Paneer, it is a good source of Vegetarian protein. It is one of the best ingredients to make recipes that are quick, easy to make as well as nutrient packed. Sharing here today one of the many recipes of Paneer that I make in my kitchen, an extremely easy and yummy roll that is best for school lunch, as breakfast or a wholesome snack for a brunch or picnic or travelling. My Jr. does not like it if I pack the vegetables and roti or paratha seperately, and hence the Wrap or Rolls always are a welcome food item.
Almost all households with kitchen have the basic spices and condiments handy, using the fresh ingredients like the paneer, green coriander, spring onions, fresh peas the rolls have a softer and more juicy filling and are very tasty. If fresh paneer and peas are not available then we can make use of frozen one, as I have done for this one. Having lived in Vadodara I am very fond of using Amul products in my kitchen and hence I sometimes get the frozen paneer packet to stock up the fridge for moments when I cannot get the fresh paneer from the stores. I am sure most of you too must be using Amul products, and have eaten Amul butter and Cheese since childhood.
INGREDIENTS: (Makes 8-10 Rolls)
Paneer: 250 gm
Mutter/ Fresh Green Peas : 100 gm
Mixed Bell Peppers : 1 cup finely chopped
Onion/Spring onion: 1 Small
Oil: 2 Tbsp
Ginger Garlic paste: 1 tsp
Coriander Powder: 1 Tbsp
Red Chili Powder: 1 Tsp
Garam Masala Powder: 1 Tsp
Chat Masala Powder: 1 -2 Tbsp (as required)
Salt : To taste
Tomato: 1 small (Optional)
METHOD:
Defrost and dip the frozen paneer in hot water, this makes it softer. Drain and dry on a kitchen tissue roll. Grate or crumble the cubes and keep in a plate.
Heat a Kadai and put 2 tsp oil into it. Add the finely chopped onion.
Then add the ginger garlic paste, saute and then add the peppers and green peas. Cook for 3-4 minutes, fresh peas do not take long to cook.
Then add the paneer crumble and sprinkle all the dried spices and salt and mix well. Turn off the heat and lastly add the teaspoon of the garam masala powder.
The filling for the roll is ready.
Take the chapati and apply the parsley or Basil pesto if you have it handy, then take a tablespoon of the paneer filling and lay it on the chapati, sprinkle pinch of chaat masala and roll the chapati carefully and tightly so that the filling does not spill out.
Roll out this size Chapati
ashuskitchen recipe-Paneer Kathi Roll
Make all the rolls and keep them in the grill machine for couple minutes so that the rolls become crispy on the outside and retain the shape.
Cut the rolls and serve with a dip or simply pack them as is for the school or office lunchbox.
NOTE: The tomato can be finely chopped and spread over the filling if the rolls are eaten instantly or otherwise can be added to the Paneer filling when it is being cooked.
For making the chapati follow the fulka recipe here. I made the roti a bigger size than the Fulka and applied oil/ghee on top of the roti and cooked it on the Tava/fry pan and not puffing it on the gas stove as for Fulka.
For the Parsley or Basil pesto follow the recipe here.
You could avoid using the pesto and apply coriander mint chutney too if that is handy. I always keep these pesto handy in the refrigerator and hence I can make the rolls at any given time as all the ingredients are readily available in my kitchen.
This recipe was saved to draft and was supposed to be on the blog earlier in January, but I completely forgot about it. I had made these rolls for my daughter when she was attending a Concert in Abu Dhabi on the New Year’s eve 🙂 .
Hope you like this Zhat -pat recipe of mine and try it out in your kitchen.
Each January month the Hindus celebrate the festival of Sankranti. In Maharashtra the new crop harvested is worshiped before the Sun god, mother used to keep the Sugarcane cubes, the red Ber, the Mutter ki Phalli (peas in the pod), carrots, Tilgul, and some whole wheat. The haldikumkum is also performed in the Maharashtrian houses, a function where the married ladies are invited at home, haldi (Turmeric) and Kumkum (Vermilion) is applied to the forehead, a ritual that I too do every year since my marriage. Also flowers and a handful of five of these foodstuff is given as part of the ‘Oti’-wheat, Sugarcane cubes, Green peas, Carrot cubes and Ber along with the TilGul (Sweet made of Sesame seed and Jaggery) and a small gift. These were the things I grew up seeing my mother offer to the invited ladies for the function. It is not always possible to get/gather all the five things that form as part of the ‘Oti’ for me since living here in the UAE. I try giving it only when I can otherwise only the flowers, sweet and the gift is given for the Sankranti Haldikumkum to the invited ladies.
Sankranti Haldikumkum tray
It is customary to wear a black Sari during this Sankranti haldikumkum, and I loved wearing my Black Chanderi Sari and my most favorite (and heirloom) jewelry-my mother’s wedding Nath and hubby’s grandmothers Ekdani (the gold & black beaded necklace). Both were gifts given to me by these elders, and I love wearing them for this special function.
The Tilgul that I make during Sankranti and offer is in the form of Laddu. I have been fond of the taste of Laddus that my mother makes and hence continued to follow her simple recipe each year. It is a blessing to carry forward the traditions set by the elders and I enjoy each and every moment of it. With the many Job changes over the years, we have moved to many different places and the numerous friends at every place we stayed have always loved these laddus and hence I have decided to share it here on the blog.
My stay in Vadodara has seen us enjoying this Uttarayan festival as it is called in Gujarat with the whole day flying kites and enjoying the special dish-Undhiyo and sweets Jalebi. It is so much fun, the whole city and state is in the festive spirits with loud speakers blaring loud music on each terrace, and the whole day spent with family and friends flying the hundreds of kites that are kept ready and stacked to last the whole day of 14th January. I learnt to make Undhiyo from my Gujarati neighbors and since then every year I make this dish in my kitchen in January. I have to hunt the local markets for the numerous vegetables and other ingredients that are needed for this dish, but the trouble is worth it. Most times my family members have packed the special papdis and Tur dana that goes into the dish for me and gave them to me if I happened to travel to India in the December holidays. Unfortunately I am yet to get all the ingredients needed and have yet to make it this January, but hopefully soon.
The most delicious sweets are always very simple to make at home, one needs a little effort and inclination to prepare and the whole family can continue to enjoy the innumerable traditional and tasty Indian recipes.
TILGUL LADDU:
INGREDIENTS:
Til (Sesame seeds): 300 gms
Jaggery: 250 gms
Desiccated coconut: 2 Tbsp
Cardamom Powder: 2 Tsp
METHOD: (Makes 15-18 Laddus depending on the size.)
Dry roast the Sesame seeds so that the raw taste is removed as they get roasted and acquire a slight brown color. Take care that you should not brown the seeds too much, this results in a burnt taste of the powder that we will make of the roasted seeds.
ashuskitchen-Roasted Sesame seeds
Powder the roasted Sesame seeds in a mixer pot. Grinding to almost a fine powder does not require addition of few drops of milk to set the laddus.
Powder the roasted Sesame seeds
Grate the Jaggery using a fine grater. I have used the solid Kholapur gur, it is easy to grate and mix.
Grate the Jaggery
Mix the grated Jaggery, Sesame powder, the desiccated coconut, and the powdered green Cardamom together. Care should be taken to ensure the thorough mixing of the Jaggery with the powder, this helps prevent lumps being formed. One can use a few drops of milk to bind if the mixture is too dry and cannot be formed into laddu shape.
Taking a small amount of the mixture shape into small laddus and keep in airtight box. The ladoos can be enjoyed for long as they have a longer shelf life.
ashuskitchen-TilGul Laddu
They are so yummy that one tends to eat quite a few, but one need to take care and avoid overeating as it might result in an upset tummy 🙂 .
I did the haldikumkum at my place last week and since then have been trying to post the Laddu draft post that I had kept ready, and today finally it is time to publish the post 🙂 .
Happy Makar Sankranti to all of you my blogging friends and readers 🙂 .
The UAE is a country that is a federation of seven kingdoms or Emirates. The capital is Abu Dhabi, the largest of the seven Emirates, and the other six Emirates are-Dubai, Sharjah, Ajman, Umm Al Quwain, Ras Al Khaimah, and Fujairah.
The first impression of the UAE as a tourist way long back was that it is a Desert country. Back then I had visited Dubai with little or absolutely no knowledge of the country (yes, how ignorant I was I to wonder now!!). It sure was a very different place as compared to now, none of today’s famous landmarks like the Burj Khalifa or the Dubai Mall or Atlantis, and not even the Metro, but still I had loved my visit. It was beautiful to visit this place where one could see people from so many countries living in harmony. The visit to Mall of the Emirates left me awestruck , never had seen a Ski slope inside a mall. The Desert Safari too was the most exciting and magical experience, a must do for visitors I would say. The thrill, and at the same time the scare, of the SUV ride climbing and coming down through the steep sand dunes was a first ever experience, the beauty of the Desert sands, the wilderness around and the camp in the center, it sure is something one should experience if you ever visit this country.
I am now a resident of this beautiful country and I sure love this place. The country, especially Dubai has seen tremendous growth, and I am witness to the ever growing change in this place, something new is always upcoming and we see constant development. The infrastructure, the public service transport, the civic facilities are top class, the greenery too is so evident and the seasonal flowers add so much color to the roads and surroundings during the harsh summer months. The pristine beaches, huge well-kept parks, are the best to enjoy family gatherings, barbecues, and also picnics with friends during the cooler months.
This country not only has the Desert sands, the beautiful beaches but also has magnificent mountains too. The landscape completely changes as we travel to Fujairah and Ras Al Khaimah, the other smaller Emirates of the UAE. The car drive trips up the Jebel Hafeet Mountain are the best mountain rides I have had, and was keen to do the Jabal Al Jais mountain road drive since I came to know about couple months ago. I was looking up to go on as the weather became cooler, and finally in December 2016 I was able to go. The road was fairly recently opened and is still under developed in terms of tourist interest things, but one can simply enjoy the long drive.
I enjoyed this drive and if you looking out for a long drive experience and being in nature then you might too. The vegetation around would be only the Ghaf trees that is seen in these parts of the desert, we do spot mountain goats that are seen roaming around, some even very high at the top of some mountain. The road passed through the rugged, wind scared surface of the mountains that which gave it a beautiful and carved look. It was very cold at the top of the mountain, and by evenings the temperature dropped and was too cold for a single hoodie and jeans clad me. The heater of our SUV was our rescue. A word of caution, if you are driving in the December month be equipped with proper winter wear as the temperatures drop in the evenings at the top of Jais Mountains.
ashu’s Road trip to Jabal Jais
Driving to Ras Al Khaimah from Sharjah takes about a little more than an hour, depending on the traffic. As one drives on towards Ras Al Khaimah, the road passes through the desert surroundings and on entering the emirate we can see the mountains in the backdrop.
I have driven through the other mountainous regions-Kalba, Fujairah, but first time to this Jabal Jais and hence the excitement to know what lay in store ahead. The Jais mountain is part of the Hajar mountain range bordering Oman. The tallest part of the Hajar mountain range lies in the neighboring Oman and the Jais mountain is the second largest of it that lies in the UAE.
After entering Ras Al Khaimah, following the Google Maps App of the cellphone we were lead on to the road leading to the mountains. I did see proper sign boards guiding us to the Jais Mountains. We had selected the cafeteria at top of the Jais Mountains on the App. It was a cloudy and windy day and the late afternoon sun played hide and seek, it sure gave some spectacular view of the surroundings, a nature lover couldn’t ask for more.
Flat ground on way to Jabal Jais
We ate our homemade packed lunch amidst the flat ground that was surrounded by the mountain range from all side. This ground area is with toilet facility, a camping & barbecue site. It is a favorite recreation for people living in the UAE to go outdoors or camping in the winter /cooler climate. Long drives, barbecues, picnicking are some of the most sought out activities during the Nov to Feb months. I too had gone for long drive and camping to Musandam in Oman (Hajar Mountain range) a couple years back during the Eid break in October.
Ghaf trees
On the way to Jais mountains.
After lunch and clicking numerous pictures with the camera and also selfies in my cell phone, we continued on our drive uphill. The ride was smooth except for the occasional speed breakers with most drivers driving cautiously, and the sun helping to give us spectacular view and different shades of the mountains. It was a magical experience at times with lovely sun rays highlighting some parts of the mountain and same time making other part dark. Though I missed on the thrill of driving on this road, but was enjoying the view and clicking pictures sitting in the passenger seat of our SUV.
The Jais mountains
Jais mountain drive
Jais Mountain ride
Sun playing hide & seek, Jabal Jais drive
Jais Mountain drive
Nearing the top we did see stops for viewing the panorama and one could halt and park the car to soak in the view. The look below of the zigzag road around the mountains to reach to the top was spell-binding from the top. The humongous natural beauty reminded me how minuscule my existence in contrast to the surroundings. In spite of this, each one of us matter and are important on this face of the Earth, a thought that I absolutely love. The view was breathtaking, the wind was super cold, and the sun was at its best, disappearing and surfacing again and giving us the perfect picture moments.
Panorama view below of Jais Mountain
The top most part is still not accessible, but we can drive to almost near it. There is space allotted to park, camp, as well as to view the mountain from the top part. We saw many families were seated around with bonfires, some using their barbecues, some even had set up tents, and many simply crowding near the cafeteria that was set up in a truck. It was serving hot Karak chai (hot tea), coffee, soft drinks, water, snacks, biscuits. It was well stocked on the basic supplies that a picnicker would need, even disposable plates and glasses. So even if the picnic party is short of any eatables or essentials the cafeteria guy seemed to have it all. The garbage pickup trucks were busy collecting the garbage and ensuring the place is clean. It is very difficult to see many folks litter around and spoil the natural habitat, I feel it is so very important to do our part to collect our own garbage when visiting such locations and help to protect the environment. It is upon us to preserve the natural habitats.
One of the Cafeteria near top of Jais mountains
One side view from near the top of Jais mountains
Driving further near to point closer to the top till where the car drive is possible.
It was almost dusk and hence low visibility for the camera to get the best shot of the construction and development below that was seen from the top.
View below from near top of Jais mountains. The sea is masked in the orangish hue of the sunset.
Sea below seen from the top
The sea was visible to the naked eye, but the camera picture does not show it very clear. For this I do plan to visit the place again, and also to wear my sneakers that I had completely forgotten as it was not a planned outing to the mountains. Do wear comfortable footwear if you love hiking, it could be a painful fall if one missed a step on deciding to climb the reachable mountain tops after parking the car. I did see many visitors climbing the smaller peaks of the mountains and getting the hiking experience, something that I missed as I was wearing fit flops. After enjoying piping hot cups of the Karak chai and coffee and cookies from the cafeteria and watching the lovely sunset colors on the horizon, we started our return drive downhill.
Cafeteria near top of Jais Mountain
Do note the road has no electric poles and hence the zigzag drive downhill in darkness would be very risky. We started the drive before it was pitch dark.
I did read recent newspaper articles that stated people camping for the night at the top. It would be a very very cold night out at the top with temperatures dropping to very low in December-January months.
I loved sharing my experience of this long drive to the Jais mountain top. Hope you readers do find it interesting and get the joy of this drive on any of the days as long as the weather permits it.
The weekend brought with it a craving for the Konkani style of cooking, with fresh coconut and Kokum, hence decided to go and buy seafood but instead we ate a Jumbo Crab lunch at one of the Dubai Restaurants. But the craving for my style of cooking of the malvani curry was still lingering and hence I decided to cook this Hara Chana for dinner, it was supposed to be the next morning breakfast 🙂 .
Green Chickpea that I used is the dried Hirva Harbara/chana as it is called in Marathi. The fresh chana tastes sweet, but even the dried ones taste bit sweeter when compared with the black chana. For this preparation I used freshly grated coconut for the gravy masala, added Kokum for its typical sweetish yet tangy taste, and used my homemade garam masala powder that I grind weekly or fortnightly and keep ready for use. The ground garam masala has Cumin, Black Cardamom, Green cardamom, Star anise, Black Peppercorns, Bayleaf, Nutmeg, Cinnamon, Caraway seeds and Cloves. I also used the dried coriander powder that has Cumin added to it while powdering it.
The coconut adds a rich creamy sweetish taste, the whole dried red chili/ red chili powder and the garam masala adds to the perfect hot and spicy taste and the Kokum imparts the necessary sourness that can be adjusted by adding the kokum pieces according to ones taste. This gravy is mouthwatering, very flavorful and yummy to those who love the Konkani or Goan cuisine, one of my favorites.
INGREDIENTS:
Hara Chana: 300 gm
Hara Chana or Green Chickpeas
Onion: 1 small
Freshly grated coconut: 3 Tbsp
Tomato: 1 Medium
Dried Red Chili: 2 no.
Ginger & Garlic paste: 1 Tbsp
Coriander powder: 2 Tsp
Red Chili Powder: 2 Tsp
Turmeric: 1/2 Tsp
Garam Masala powder: 1 Tsp
Salt: To taste
Kokum: 5 pieces
Cooking oil: 2 Tbsp
Water: As needed for boiling the chana and also to add and adjust the thickness of the gravy.
METHOD:
Wash the dried Hara chana and soak in water for 5-6 hours or overnight. Boil it for 3-4 whistles in a pressure cooker.
Heat Kadai or fry-pan on the gas stove, add few drops of oil, then put the red chili, the chopped onion and saute, then add the chopped tomato and finally add the grated coconut and fry till this masala is cooked. Grind this to a fine paste once it is cool.
Hara Chana Gravy masala
If the ginger garlic paste is not ready, then we can add a small piece of ginger and 4 garlic cloves to the above masala while grinding.
Heat another Kadai and add the remaining oil, put the ground masala paste and ginger garlic paste and cook till the oil separates and is seen at the edges of the kadai. Use little quantity of water, if required, to fry the masala as this prevents the masala from getting burnt. Then add the turmeric, red chili powder, kokum, salt and simmer for a minute or two and then add the boiled chana to this masala. Let it cook on slow flame for 10 minutes. This allows the masala to mix well with the boiled chana. Do add all the water that is in the boiled chana when it was kept for boiling.
Add the garam masala just before the gas is to be switched off. Garnish with freshly chopped coriander.
ashuskitchen-Hara Chana Malvani style
SERVING OPTIONS: This can be served with Puri or Paratha or Roti, Dosa, set dosa or any bread of choice. I served it with whole wheatflour puris and some finely chopped onions. Rice and Hara chana gravy too can be another option.
ashuskitchen-Hara Chana Malvani style served with Puris
NOTE: The home ground garam masala is fresh, stronger in flavor and hence very small quantity is required. If you are using outside store bought one then do adjust quantity as per the taste.
I enjoyed eating this yummy dish and feel happy to share it here with you all. Providing the links below to some other similar recipes that you might find interesting from ashuskitchen 🙂 .
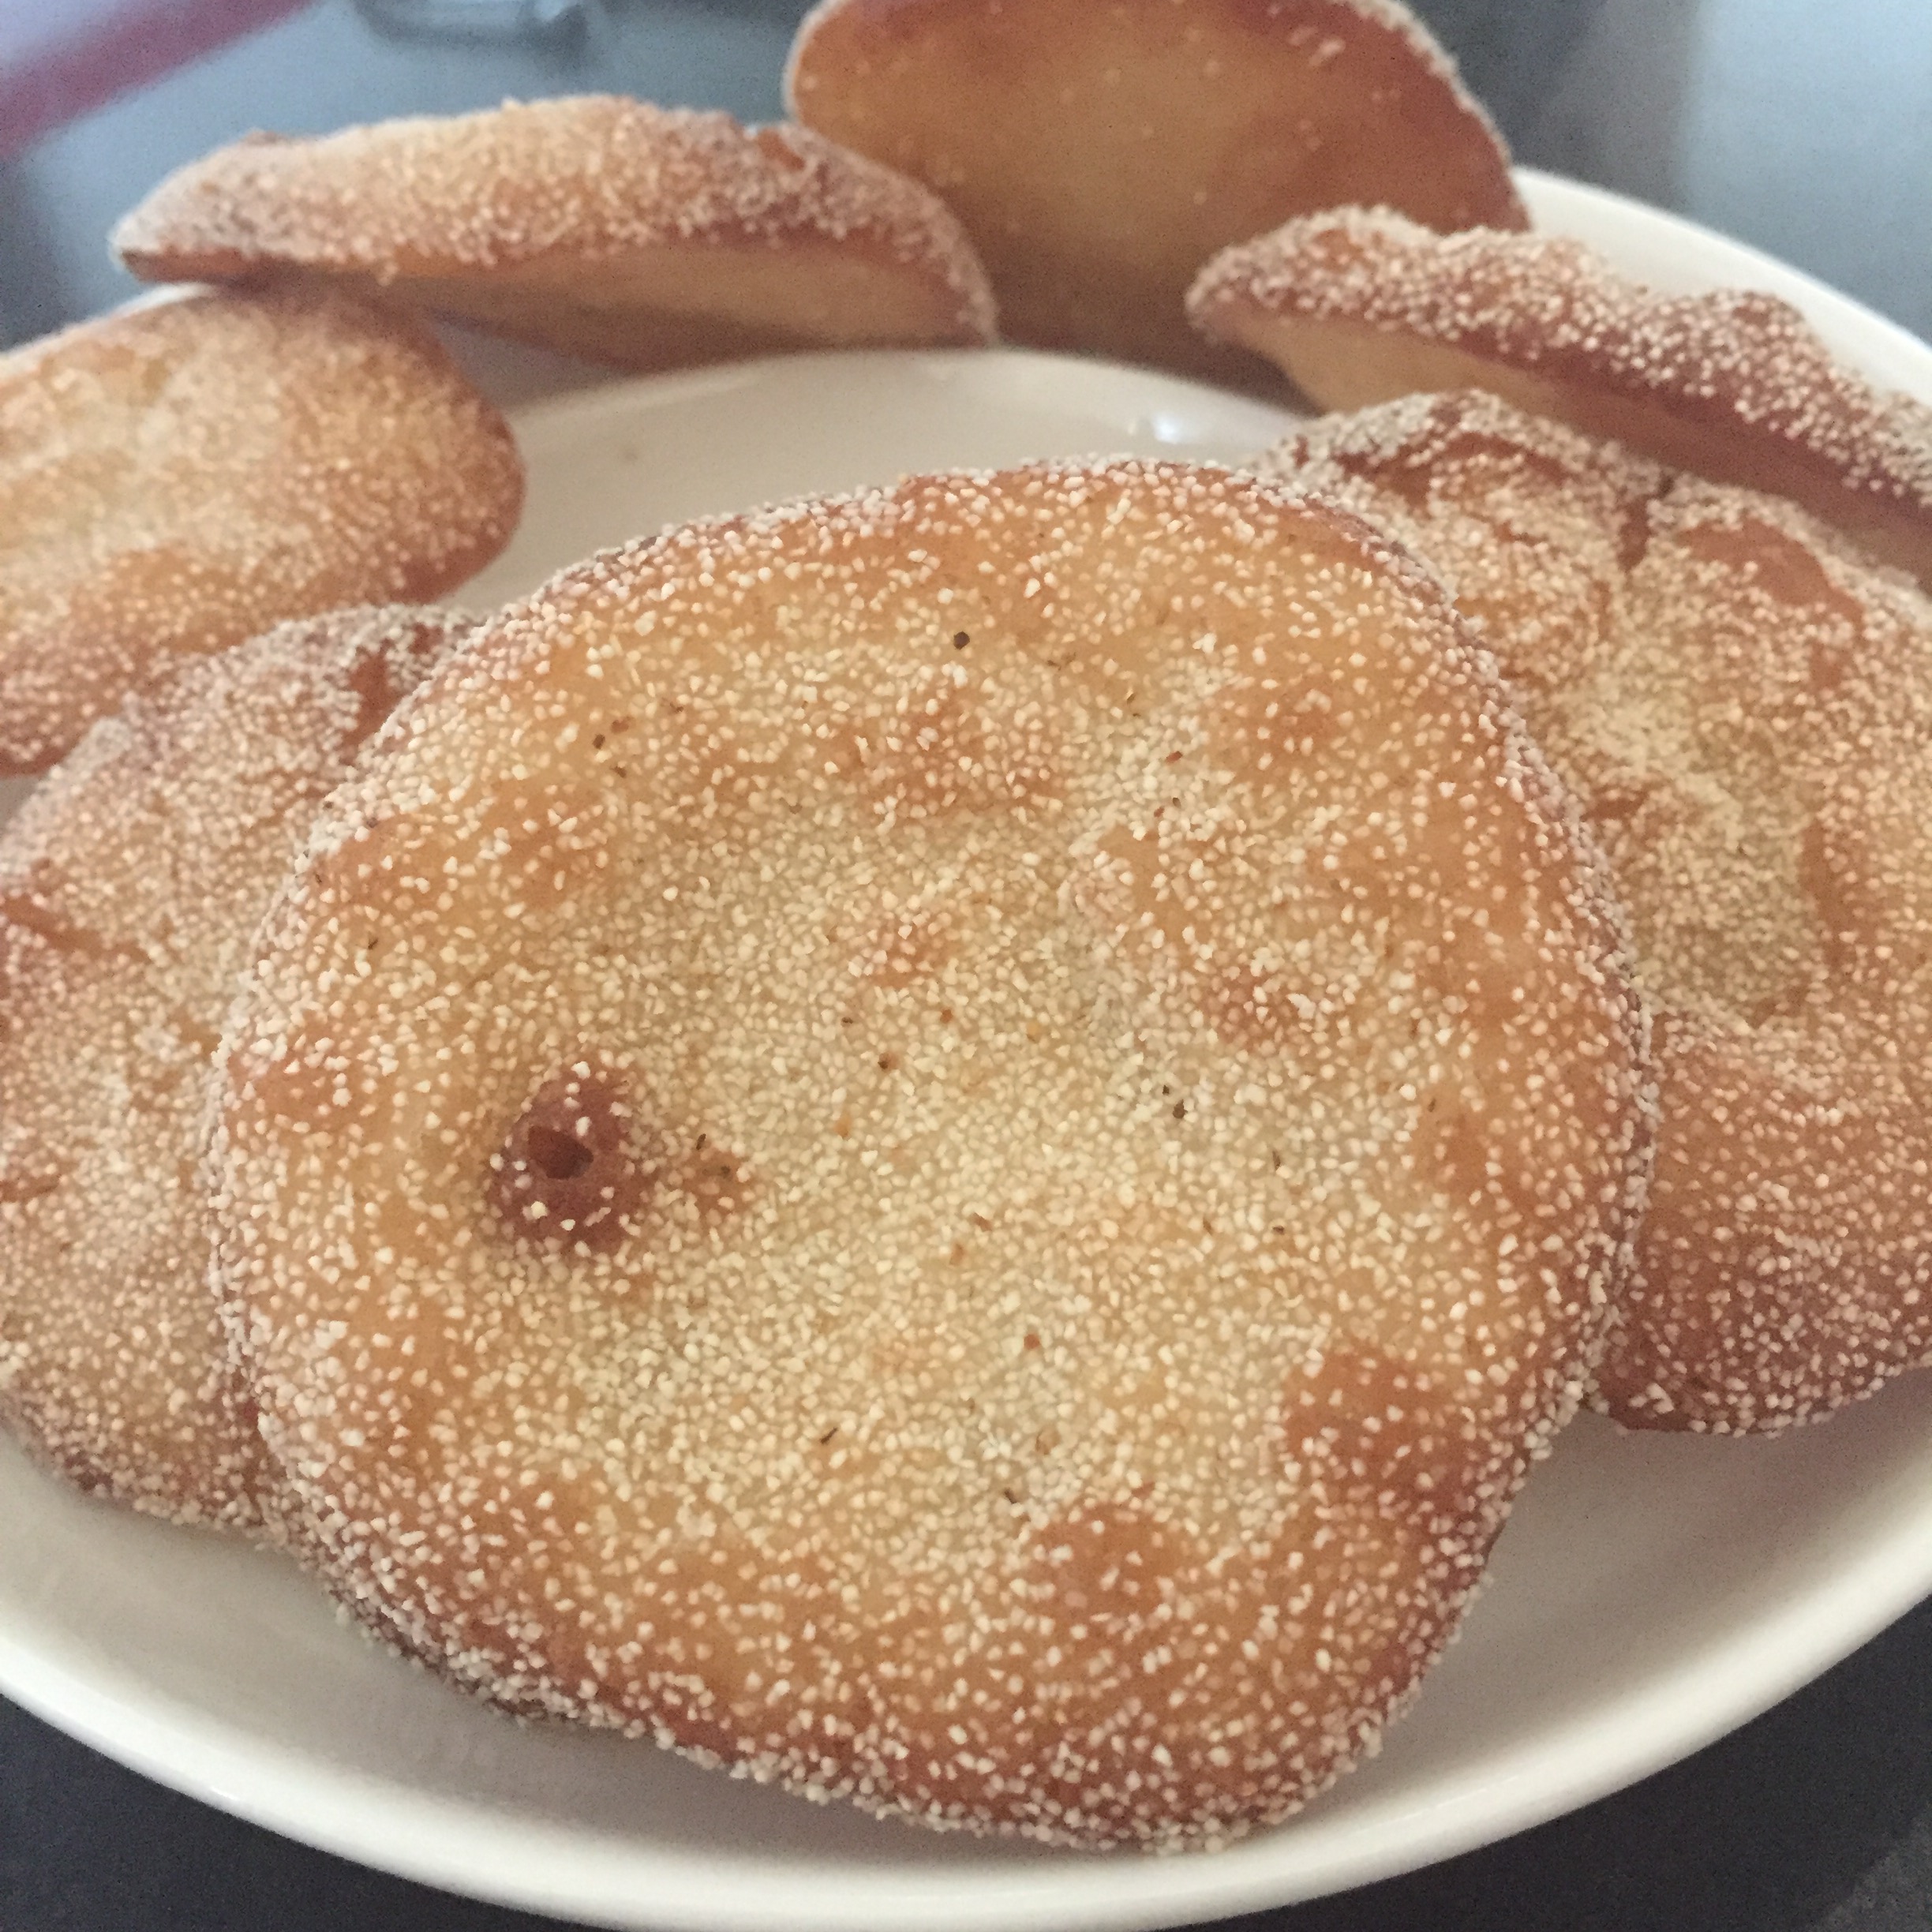
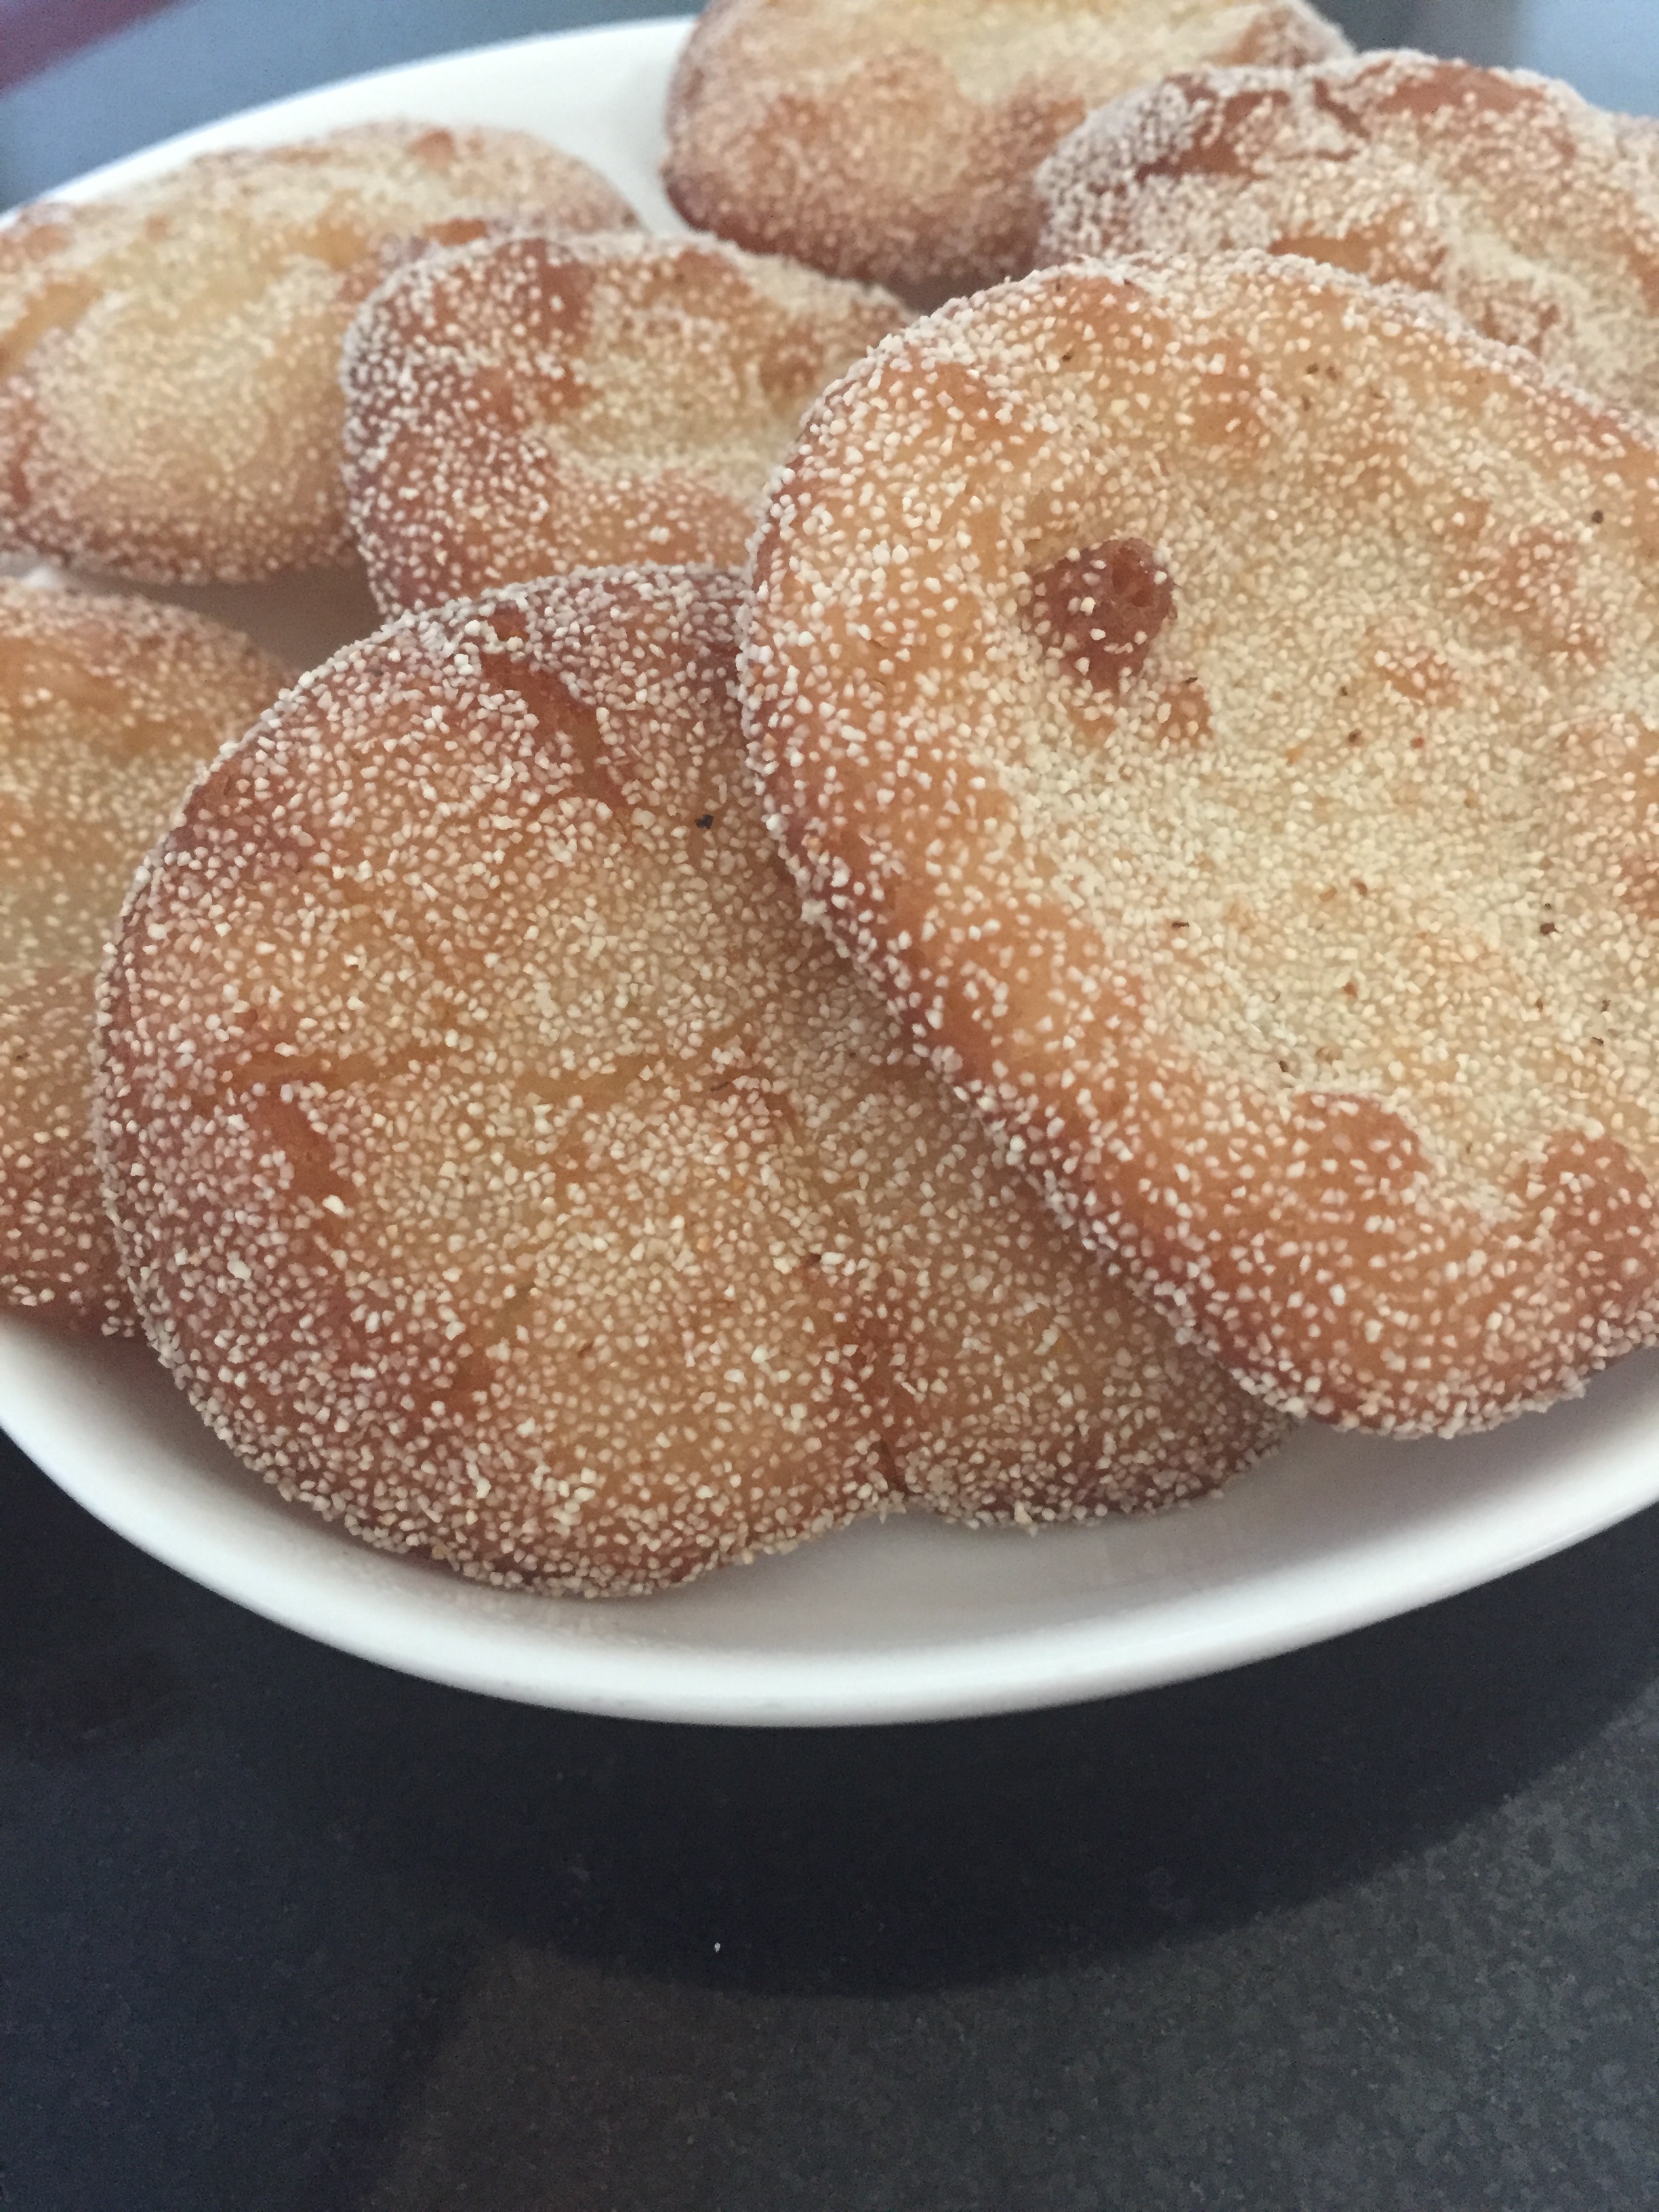
The memory goes back to the days during Diwali time when early mornings Mom would restrict our entry into the kitchen. It was quite intriguing as when one was not allowed to enter the Kitchen that was the time when the urgency to get something from the kitchen would surface. Every Diwali on the Narak Chaturthi day, the early morning bath day was how the day is remembered as, my mother would make these Anarsas, a Maharashtrian sweet that is made of rice and sugar. It is one of my favorites, and the preparation involves a very tedious/elaborate method, I had never attempted it in my kitchen until last year. Whenever I visit my mom’s house she has always made this for me and always packs this sweet for me to bring home. This was another reason to never attempt it before. But there always was the nagging reminder by my ever eager mind to start making it in my kitchen, finally this happened from last Diwali. Last April mom had visited me here in the UAE and she had made the Anarsa at home and explained me all the details of its preparation. Finally I think I now know how to make them, and hence posting this here to document it for anyone interested to learn and also for my own future reference 🙂 as well.
Anarsa, is one of the sweet items of the Diwali Faral or snacks in the Maharastrian menu. The ingredients used are rice, sugar, poppy seeds, and ghee or oil for deep frying. Anarsa when fried in ghee tastes very delicious, though one could also use oil. I have modified my mom’s original recipe a bit here. As the use of poppy seeds is banned here, I have substituted it with Semolina.
We have to soak the rice for three days, change the rice water every day, then drain it away after three days, pat dry the rice and powder it. The powdered rice is sieved to ensure we get very fine rice powder. This rice powder is then mixed with the powdered sugar, and the mixture is given a round ball shape and kept in an airtight container or box in the cupboard. We leave this for at least a day or more before making the Anarsa out of it, this mixture lasts for many days without getting spoilt. One can refrigerate this mix to last for a month or two too, but must be kept in airtight box.
INGREDIENTS:
Rice: 2 Bowl /Katori (200gm)
Sugar: 1 &3/4th Bowl (175gm)
Semolina: 2-3 Tbsp
Ghee/Oil: 250 gm
Milk: 1 Tbsp
METHOD:
Wash the rice and soak it in water for three days. Daily change the water of the soaked rice.
Drain the water at the end of the third day and dry the rice with a kitchen towel or tissue roll.
Grind this rice in a mixer to get fine powder, use the finest sieve to get fine rice powder.
Grind the sugar too to get a fine powder.
Mix the rice and sugar powders, use 1-2 drops of milk, only if required, to form a tight ball shape of this mixture. The milk is used just to bind the two powders together. One might not even require the milk as the rice powder is bit damp, hence use self discretion to decide whether to use milk.
Keep this powder dough ball in an air-tight container or box. Keep this for at least a day before using it to make the Anarsa. This mix would last for many days to months too if refrigerated and kept airtight.
Anarsa dough ball
After a day or two take out the powdered rice ball and break it in a bowl or plate. Mix it well, add 1 tbsp milk to it and make a stiff dough. Knead it well, use only few drops of milk at first and go on adding more drops only if required, but the dough should not be too soft. It will be sticky, use ghee to prevent it from sticking to hands.
Break this Anarsa dough ball
Using drops of milk knead a stiff dough
Roll out the dough and cut equal sized portions of it and give them round shape.
Cut equal-sized small dough portions from the Anarsa dough roll.
Take each round ball and press it on semolina giving it a round shape.
Keep the dough on the Semolina and give it shape.
Forming the perfect round-shaped Anarsa
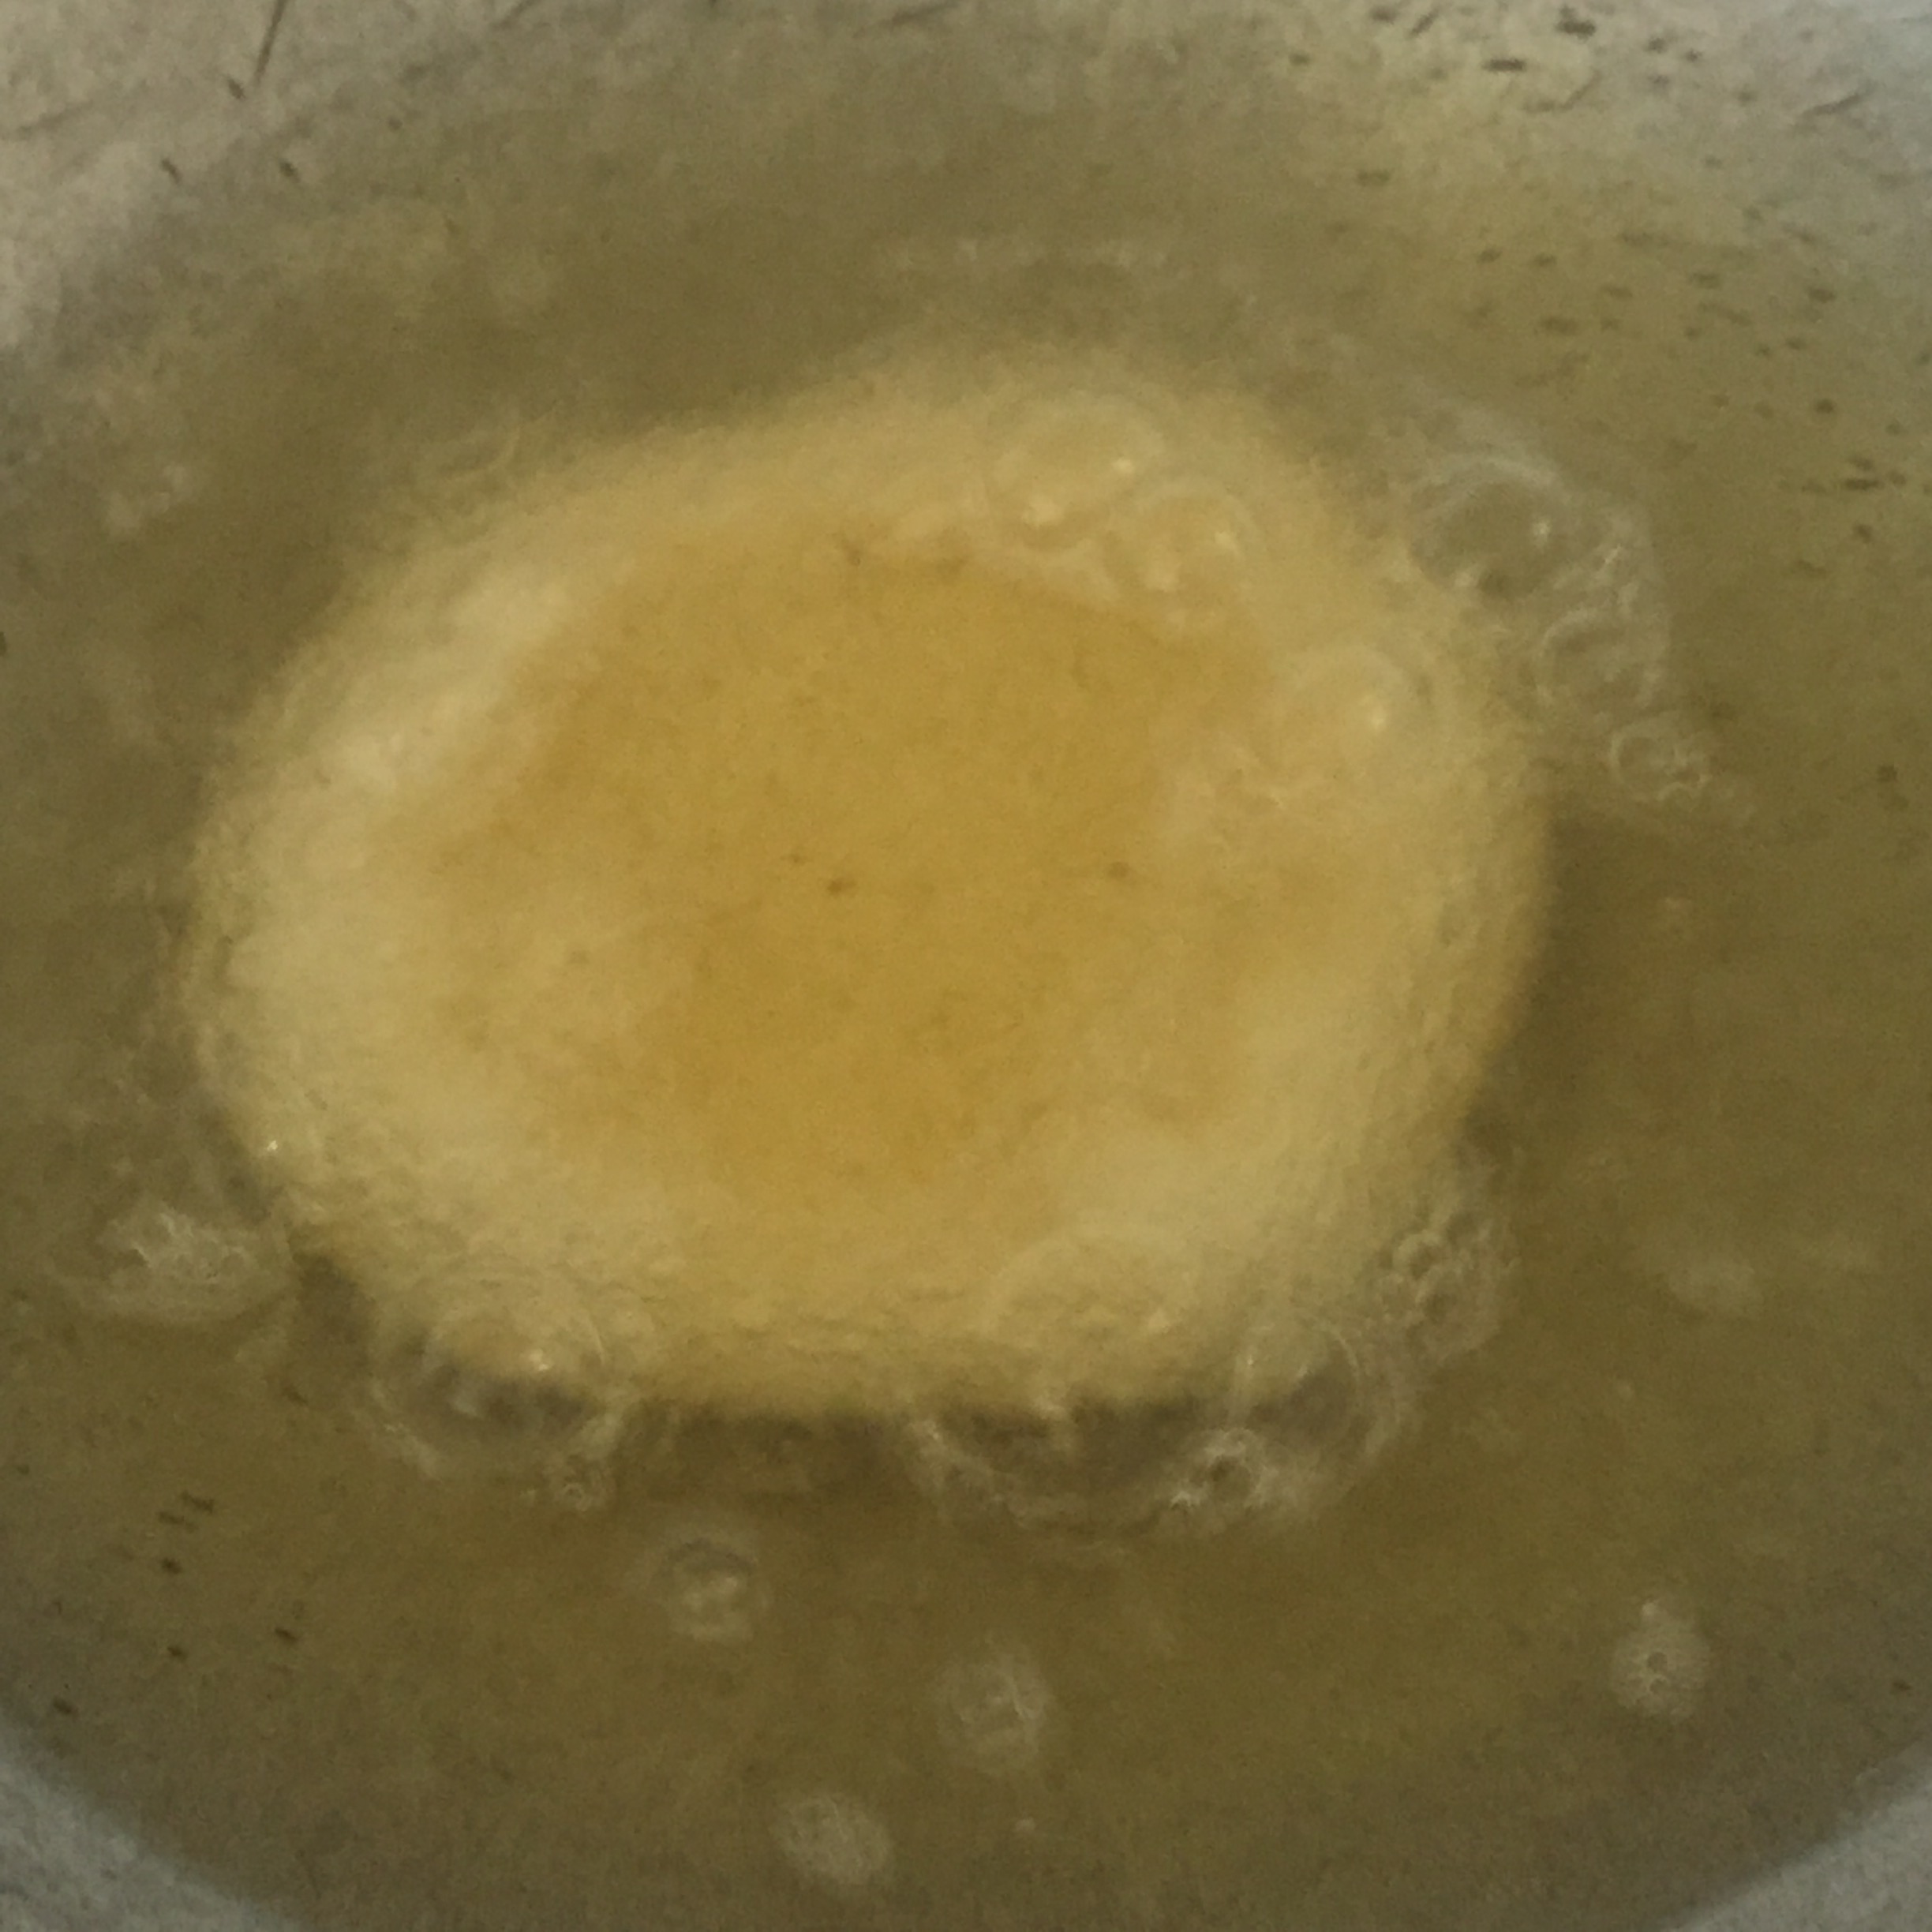
Heat the ghee in Kadai on medium flame. Picking up the round-shaped Anarsa slip it semolina side up into the Kadai for frying.
We give support to the shape by holding a sieve type frying spoon under the Anarsa and by pushing the ghee over it using another frying spoon. This ensures the even color and cooking of the Anarsa. If the dough is bit loose then the shape is not retained while frying in the oil and the whole dough disintegrates, the spoon gives it support until it becomes firm and cooked. Keep the gas flame from medium-to-low while frying the anarsa, for the even cooking and color.
Fry the Anarsa till it is cooked and an even reddish color is attained.
ashuskitchen- Anarsa Recipe
Drain the fried anarsa on a kitchen tissue so that all the excess ghee/oil is soaked on it. Keep these fried goodies in airtight box and enjoy them as and when you wish to eat.
This recipe is learnt from my mother, have modified it according to the ingredients that are available for making it here. This is prepared as a Diwali sweet so it sure holds a special place in the Faral plate that we serve to family and guests. I had always felt my Diwali snacks as being incomplete until last year, as my favorite Anarsa would not be seen in the plate, but not anymore 🙂 .
ashus Diwali Faral/snacks 2015
ashus Diwali Faral 2016
ashus Anarsa recipe
ashus homemade Diwali snacks
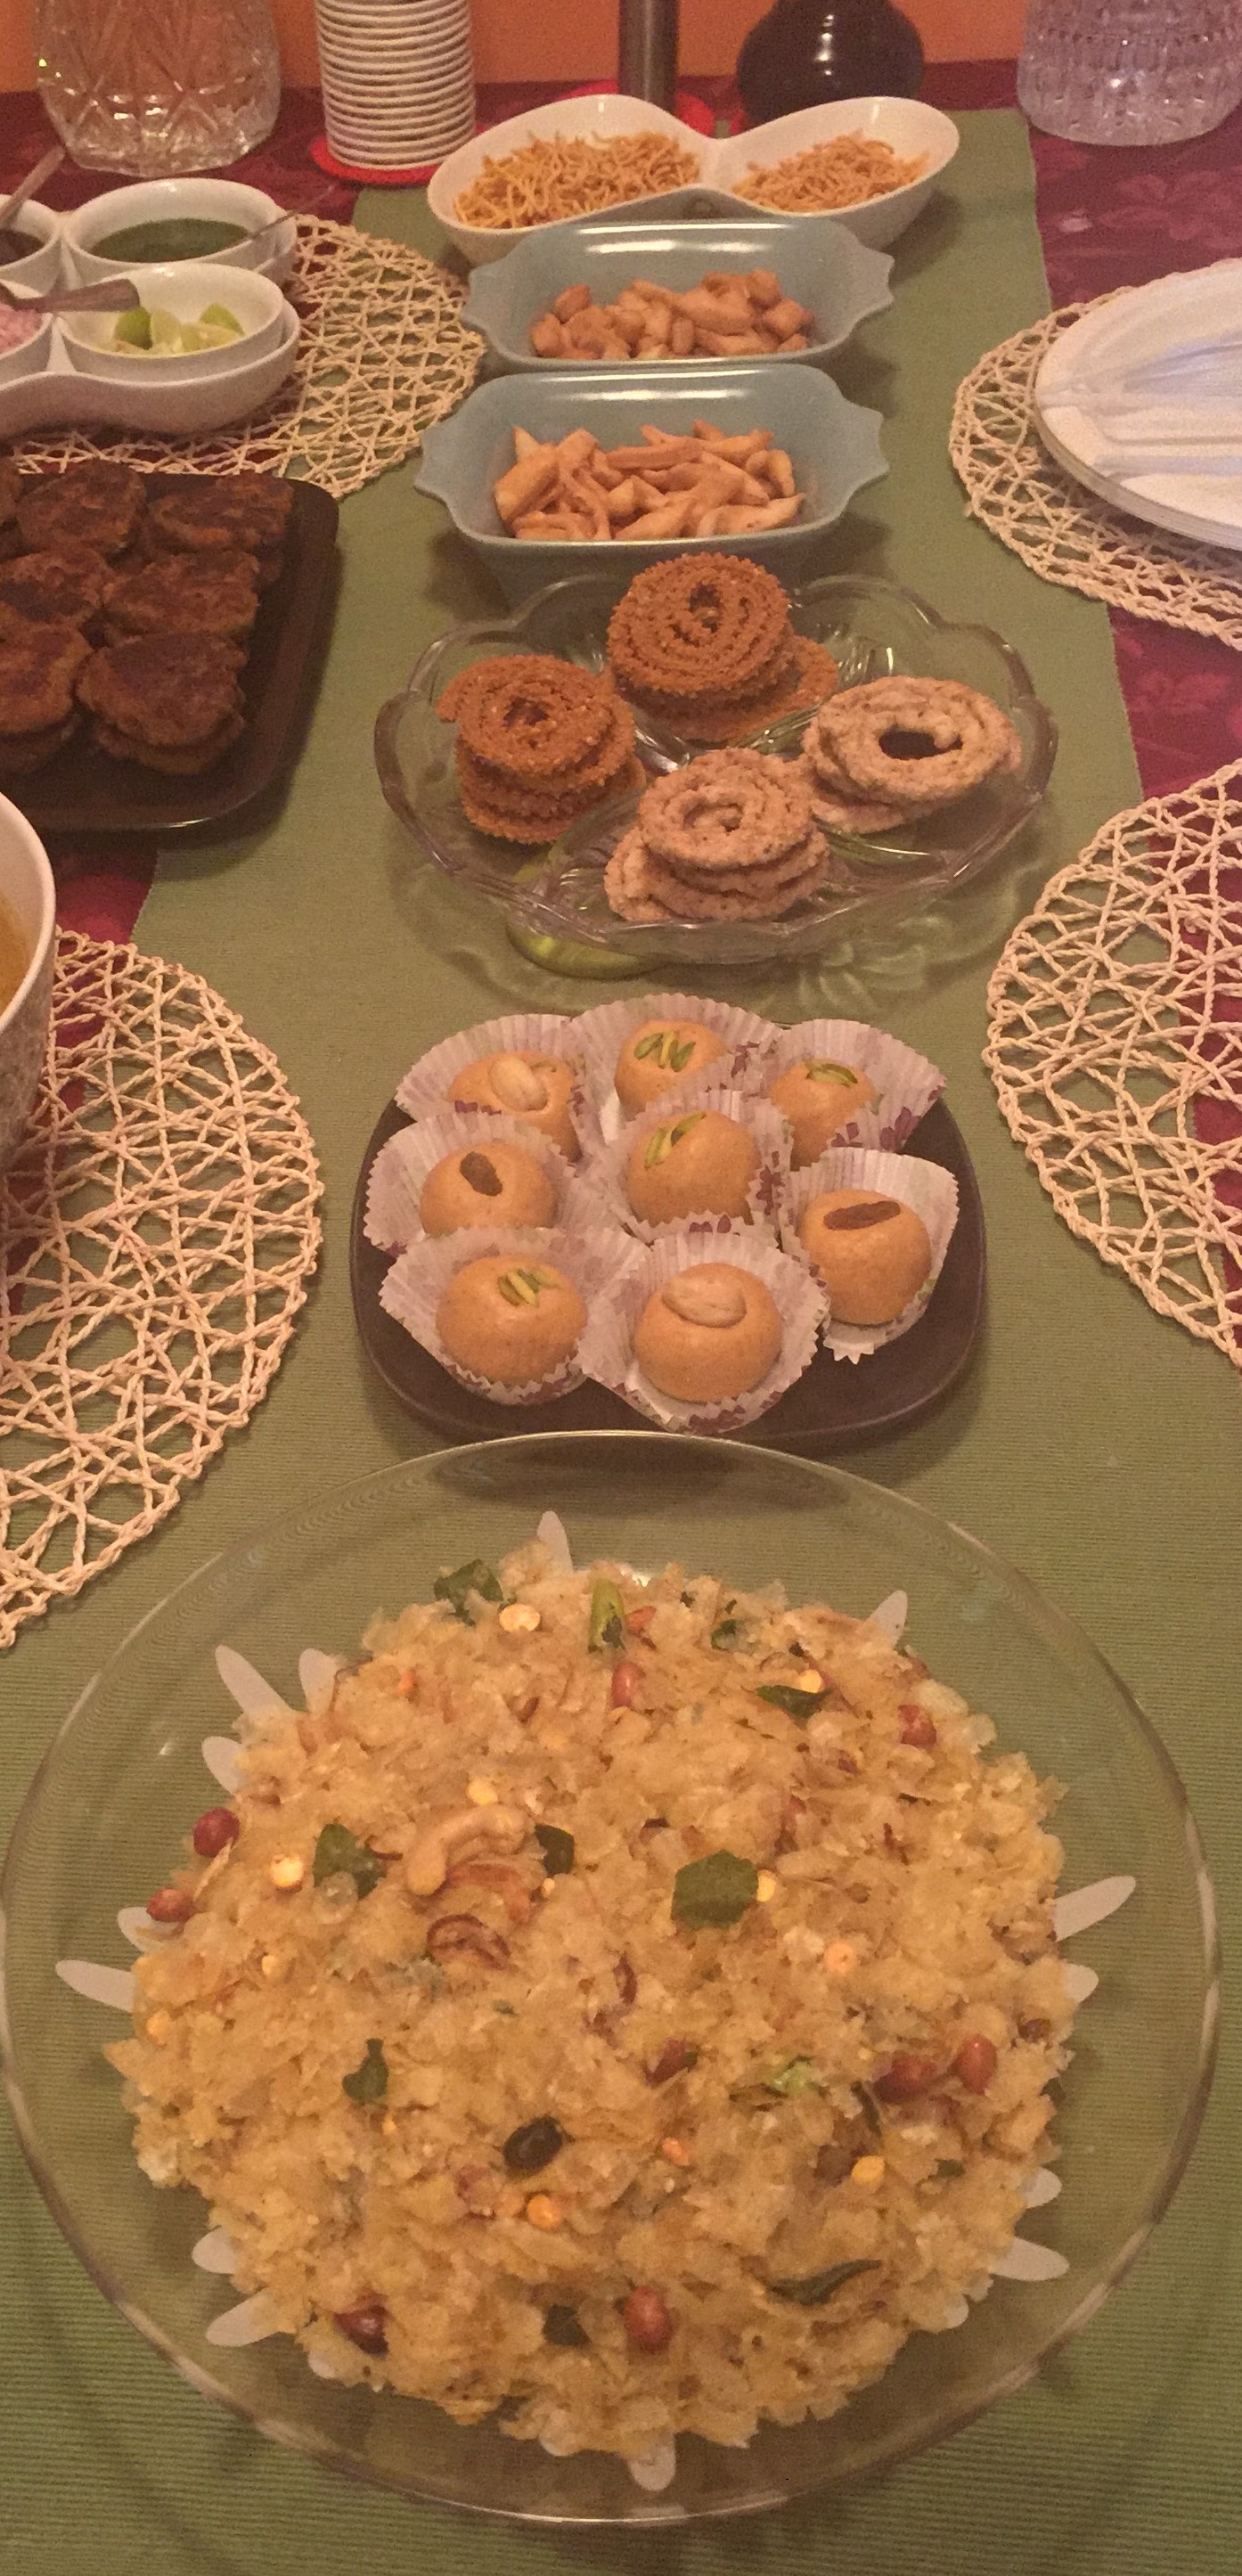
These were the snacks that I had served to my friends during this Diwali, last month 🙂 . It includes Chivda, Besan Ladoo, Andhra rice chakli, mom’s special chakli, savory and sweet types of Shankarpale, Besan sev.
It feels good to share this Anarsa recipe with you all. Looking forward to hear your thoughts on the post.
It is the awesome weather days here in the UAE, perfect wintry mornings to start the day sipping piping hot masala chai . As I water my balcony plants and enjoy the reflection of the sun rays from the glass pane of a multi-storey building across the street falling on our balcony plants and was admiring this calm moment being in midst of nature, these Colocasia leaves spread out in all directions catches the eye.
Colocasia leaves
This potted plant was brought home from our friend’s garden, they live in a big power-plant township and have a beautiful house with gardening patch on all sides of the house. The front garden has all the fragrant flower plants, the sides have Papaya trees and Colocasia plants, and in the backyard is the vegetable patch where she plants all the seasonal veggies. I get some supply of home-grown vegetables from them whenever anyone of us is visiting each other. The leaves, as seen in the picture, were growing big and so I made use of them to make this famous Maharashtrian recipe. ”Thank you” Naina (if you happen to read this) for giving us the plant and the joy of enjoying the fresh garden leaves Alu Vadis :).
This is also a popular recipe of Gujarat state of India, where it is known by the name Patra/Paatra.
ashus-Alu Vadi/Paatra
INGREDIENTS:
Alu leaves/Colocasia leaves: 10-15 nu.
chickpeas Flour/Besan: 200 gm
Tamarind : 20 gm
Sesame seeds: 1 Tbsp
Ajwain/Carom Seeds: 1 Tsp
Red Chili Powder: 2 Tsp
Turmeric Powder: 1 Tsp
Garam Masala Powder: 1/2 Tsp
Salt : To Taste
Water: 200 ml (As needed to make a medium thick batter).
Cooking Oil: 200 ml ( for deep-frying)
Note: I have used medium-to-small leaves.
Alu Vadi ingredients
METHOD:
Wash and clean the leaves, and dry using the kitchen towel/tissue. Soak the tamarind in 50 ml water/half katori water. Use this tamarind pulp, but sieve it before use.
Take the besan in a bowl, add all the spices, 1 Tbsp oil, Sesame and Carom seeds, tamarind pulp and mix. Add only as much water as required to make a medium thick batter.
Apply this chickpeas flour batter to the underside of each leaf, then place another leaf on top and apply the batter, and then again place the next leaf on top and continue the layers.
Colocasia leaves and chickpeas flour batter
Apply the prepared batter to the leaf
After a few leaves, fold the tops parts of the leaves and bring to the center, then fold the lower part and form a bundle-shape. Apply another coat of batter on the top of the bundle. Start applying batter to the remaining leaves and form another bundle if any leaves were remaining.
Grease the cooker basket/plate to place in the cooker to steam these Colocasia bundles.
Colocasia leaves coated with chickpeas flour batter
Steam the leaves for 15-20 min in the steamer or pressure cooker (without whistle).
Steamed Colocasia pinwheels
When cool then cut the steamed roll into thin slices, and deep fry until crisp in hot oil. One can also shallow fry them using little oil, if one does not like deep-fried foods.
Fried Alu Vadi/ Paatra
Serving:
Serve the crispy fried pinwheels with tomato ketchup or mint yogurt dip. It is served as part of a Maharashtrian thali meal too. It is usually cooked on occasion of festival and served as fried item of the special menu.
The steamed pinwheels are also used to add to a spicy gravy or can be cut and made into a dry sabji as my mother used to make, it was one of my favorites. I will have to wait for the next batch of leaves to make the dry sabji post :).
This is also a favorite snack in Gujarat. During my stay in the state, I would see it as a snack item sold in Farsan shops, a fasting selling item that would get sold out within an hour or so in the shop near my residence. In Gujarat they do add a little |sugar to the ingredients list, but I have never used sugar. The tamarind is used to avoid itchy discomfort in the throat that it causes, an irritant in the leaves causes it, to some people after eating. Lemon juice can also be used, but I feel the tamarind pulp gives the batter the perfect taste.
I enjoyed sharing another of my Maharashtrian recipe with you all, looking forward to hear your thoughts.
Have a great weekend, Happy Sunday. For us, in this part of the world, it is the start of another week tomorrow. Enjoy 🙂 .


You must be logged in to post a comment.